More Green For Less Green

Living more eco-friendly for less money

3.26.2010

Worms, Glorious Worms!

Worms have found my compost bin. I am so excited! Check them out!

Squeamish? Really, all you can see here is arrows.

Not Squeamish? Click on the image to open a full-size version and see the worms in all their cute, wriggly glory.

In addition to the worms, I can see some decomposition in my compost. It is happening much more quickly that my ground piles ever did, probably because I turn it more often and add new greens more often.

Speaking of ground piles, I made this simple chart awhile back for the pile at work since it was (theoretcially) a community pile. I could never figure out a good way to post it outside, so I never actually used it. My thought was laminated paper staple-gunned to a small wooden post, but I never actually did it. I am a private composter these days, but I wanted to share this chart in case it helps someone else.


Click on the image to open a larger version.

Happy composting!

Labels:

House Update: A Moment of Glory, Many Moments of Humility

Last Saturday I was thrilled to be featured on one of my favorite sites, The DIY Showoff. I now get to add this super-cute badge to my blog!

It was great to get an outside reminder of how far we’ve come on this house. Though I try to always see myself as a “have” rather than a “have not,” it is easy to get bogged down and lose sight of progress. So, yay for taking the house from ick city to a place we live and (mostly) like, in only four months. Yay that it has been over a month since we’ve seen a cockroach; the living room, dining room, hallway, and bathroom are painted; the office is 3/4 painted and the kitchen cabinet doors are 1/10 painted; our roof didn’t leak when we had all of the snow on it last month; we didn’t have any water problems even when all of the snow melted; and yay for all of that cleaning that kept on going, and going, and going but now in much of the house you'd never know about the previous squalor.

Now onto some big things facing us:

  • HVAC system is only partially operational and needs mega help. We can replace just the the dead (and not reparable) condenser unit with an new, but older model that is compatible with the 12-year-old air handler: affordable price, but who knows how long it will last, and it won't be energy efficient. Or we can replace both parts of the system for three times the cost, but we'll get some back at tax time and will have a cheaper electric bill. Our basement is not heated and neither of these plans include heating for the basement, but today one of the companies we are shopping offered us a system powerful enough to heat the basement at no extra cost if we go with them. Hubby would have to do the basement ventilation himself, but maybe we can get that negotiated in, too. It is tough to pony up the money, but in the land of counting our blessings, yay for that $8,000 first time home buyer credit that we never factored into our budget--until now.

  • Bathroom ceiling is falling apart and must be replaced. It was trashed from an old leak when we moved in, but fresh paint kept in decent for a few more months. Then, water started leaking in through the ventilation fan and it started crumbling. The leak is fixed, but the ceiling still needs to be replaced.


Please ceiling, don't get my cute shower curtain dirty!


View from inside the shower


  • The sump pump and pit need a total overhaul. Due to poor design, the pit cannot fully drain so gnat larvae have taken up residence. We have the actual gnats controlled with a mosquito dunk (also great for rain barrels and other standing water), but the larvae don’t seem to be effected. The previous owners pumped their kitchen and laundry wastewater through the sump pump and into the backyard, so the pit is just really gross, despite me diving into it and scrubbing multiple times (shudder). The pump itself no longer turns on automatically, so we have to check on it and manually lift up the float.


Sump pump on inspection day with kitchen & laundry wastewater flowing through it.


Cleaned up and wastewater pipe closed off. The brown powdery stuff is a natural enzymatic cleaner designed to clean septic systems and eat away grease.

Hubby and I are both taking a week off from work in April to do stuff around the house. It will be great to see how much we can get done. Here’s hoping for good weather! We will be having an open house/my birthday/thank you to the army of volunteers who helped us party in May.

P.S. If you are thinking about buying a home, please, PLEASE make sure you have a hearty amount in savings for the unexpected (separate money from an unemployment emergency fund). Our HVAC passed inspection, and yet here we are. We do have a home warranty, but they denied both our claim and our appeal. And, had they approved our claim, they would've only kicked in $1,500 before reaching the maximum per-claim amount. We knew that this house had many problems, but for every known problem--with any house, not just foreclosures--there are always more things that are unseen.

Labels:

3.24.2010

Still Have An Old Sigg Kicking Around?

The voluntary Sigg recall is long over, but some people who missed the free replacement boat might still be wondering if their bottle has the old, BPA-containing liner. Here is how to tell:

If the liner is brassy (orange bottle) that is the old liner revealed to leech BPA. Use it as a flower vase or for whatever purpose you think up or recycle the bottle with other aluminum.

If the liner is opaque beige (pink bottle) you have a bottle from the first batch of the new, BPA-free liner. The bottles in the first batch were coated with too much liner, which--as you can see from the stringy thing hanging from the pink bottle--begins to peel off. If this happens to you, contact Sigg. They may replace your bottle.

If the liner is silvery-beige (black bottle) this is a bottle with the new, BPA-free liner and an appropriate coating of liner.


Beige New vs. Brassy Old


New Bottles
Too Much Liner vs. Right Amount

I am trying really hard to still believe in Sigg. I receieved great customer service from them right after the BPA news came out and again recently. Hopefully the new bottles are finally what Sigg promised from the beginning!

Labels:

3.18.2010

Indoor Seed Starting

I started growing some of my seedlings indoors using the paper towel method that I read about at The Dirty Radish here and here. She refers to it as seed sushi, which I just love to say. Rebel that I am, I decided to start my rolls in lidded Pyrex (which I am obsessed with and own tons of) rather than plastic bags (which I detest, because we have a policy of washing and reusing them and it is a hassle). After a day-and-a-half, I realized that this was a mistake. The rolls dried out way too quickly with the greater air circulation between the rolls and the lid. I am a totally newbie at gardening, and though I have done obsessive amounts of reading, I really don't have much practical experience yet. So, enter the first of many mistakes I am sure to make!

Now ready to actually follow the guidance of others, I sanitized a plastic bag (yes, I actually used my nemesis, bleach) and put the rolls in there, as I should have done from the start. That did the trick! I still need to spritz the rolls about twice a day, but now they never totally dry out.

I am tickled with this method. At one week in, the eggplants and jalapenos were almost free from their seeds and the bell peppers had little root tails. At a week-and-half-in, I was able to plant some of my seedlings. The only bust so far is the rosemary, which is notoriously hard to grow from seed, so I don't feel too bad. Out of 12 seeds, only one shows the slightest sign of growth.

Thrifty girl that I am, I couldn't bring myself to buy labeling sticks when I ran out of the craft sticks I had on hand, so I cut up the lid of a large yogurt container and wrote on the pieces with a Sharpie.

Below is a picture of my set up in the basement with a mix of seedlings in potting soil and seeds still emerging with the paper towel method. The light chain isn't very long, so I've got a combination of the seed tray, egg cartons, and wood stacked under the heat mat to get the seeds close enough to the light. I keep my spray bottle of water upstairs so it stays warmer and doesn't shock my little guys by being too cold. The light is on a timer, I've got it on for 14 hours a day right now. The heat mat (not visible, it is under the green tray) stays on all the time.

Coming up in the world of indoor seed starting: I'll do bergamot (the herb, not the orange) and oregano; then tomatoes, ground cherries, and thyme; then marigolds; and possibly lettuce somewhere in there. After that, it will be time to sow the outdoor seeds.

Labels:

3.16.2010

Homemade Compost Bin

In the past, I have kept a simple compost pile on the ground, with good results. When we lived in the condo, I composted on the grounds at work (read about it here and here). Decomposition went very well, but the compost never actually got used. Last spring, my coworker on the buildings team accidentally squished all of the compost back into the forest floor in a mishap with a rented tractor. (I think he was either trying to turn the pile or scoop up the compost to use it.)

When we bought the house, I started a ground pile at home and ditched the work one. That reminds me, that partial second year of compost is still sitting on work grounds and decomposing. I guess I should remind my coworker that it is there since it is time for spring planting to spruce up the grounds. It would be great to see it put to use! Anyway, back to the house pile...being that I started the pile in in December and then we had a snowy winter, the pile didn't do much.

When we moved into the house, I noticed that the previous owners left an old, beat-up, plastic trashcan with no lid. I started eyeing it as a potential composter. After all, if it could be free—or at least dirt cheap—I’d like to try bin composting. I totally believe in the simplicity and relative cleanliness of a ground pile, but I like experiments, and I like sharing them with you.

It took me some time to figure out exactly what to do with the trash can and to find the time to do it, but I finally did. Here you go...

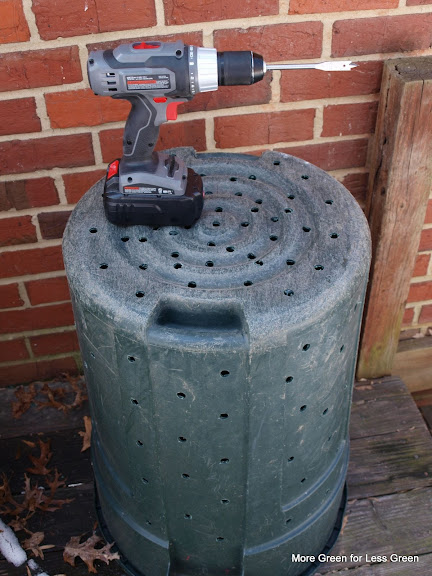
With a ½ inch boring bit, I drilled holes around the sides and bottom of the trash can. As you may notice, I did not drill holes up to the very top of can. I did this for several reasons: to remind me to not fill it that high for weight reasons (I need to be able to flip it); to remind me to get multiple bins going for use at different times and not obsess over getting this one filled to the brim; and finally, some trashcan composters are used upside down with the top cut off, so instead of flipping it, you just lift it up. I wanted to leave as much structural integrity in that part of the can as possible in case I switch to that method.


Because the trash can did not have a lid, and we were not able to buy just a lid, we needed to make one. We recently got some building supplies from a Freecycler, so hubby cut some of that wood to be the lid. I then drilled holes in the wood to allow rain in. We bought a rubber cord with hooks on the end (from Home Depot) to hold the lid on securely.


I shoveled my ground pile into the composter, and I will turn it with a cultivator/claw. We bought both tools on Craigslist for $10 each.

So far, I’ve noticed that flying bugs like the composter. This was not a problem with the ground pile because no food was ever directly exposed to the air (it gets covered with browns). In the container, food may be pressed against a hole and thus draw attention. So far, that is the only drawback. In terms of adding food, it is much easier because I don’t have to dig it in and then obsessively cover it with browns. So, we'll see how it goes!

Labels: ,

3.14.2010

The Joy of Repurposing: 2 Minute $0 Decoration

These gold, brown, and clear baubles came in a flower arrangement that hubby’s office sent us when we got the house. I just loved them and thought that they would go with our retro gold living room decorations, so I set them aside figuring that someday I could put them to good use. Enter this little candle holder that I received as a Christmas gift that I liked, but with just a candle in it seemed kind of plain. After having both things around for months, suddenly inspiration hit. 2 minutes of futzing and voila!

Labels: , ,

Reusable Cold Cup

I recently bought this reusable, cutie Copco Cold Beverage To Go Cup from Bed Bath and Beyond for $7.99 (plus 20% off with a coupon). I rarely drink soda, but if I did, I would totally try to get fast food places to fill up this cup instead of their disposable ones. I do enjoy the occasional treat of a frozen drink at the coffe shop at work or a milkshake from Chick-Fil-A (which come in polystyrene cups—ick). The coffee shop uses my new cup with no issue, but I haven’t tried it anywhere else yet.

What I love about this cup
  • Reusable
  • Secure lid that is easy to screw on
  • Fat straw/stirrer, sturdy enough for chunks
  • BPA-free
  • Dishwasher safe
  • Affordable price
  • Feels solid
  • Tag is made from post-consumer recycled paper
  • Some places give a reusable cup discount
  • You can fill it up to the very brim and the lid still fits on without overflowing the cup

What I don’t love about this cup

  • Made in China
  • Made from virgin materials
  • I wish it came in more colors
  • Too big for the size of drinks that I usually get (but I show people that the middle of the brown section is 12 oz.)

Copco also makes a double-walled hot cup version that comes in several colors and features a sipping hole in the lid, just like disposable cups have.

Update: I brought my cup into a McDonald's for my annual Shamrock Shake and they used it without question. Added bonus, instead of filling it to the 16 oz point, which I estimated for the cashier, she filled the whole thing for me.

This guy is also great for drinking ice water out of. Sipping ice-cold water from a straw seems almost like a restaurant treat.

Labels: ,

3.09.2010

Decoration Inspiration

As we continue to spruce up our house using as much as possible that is used, repurposed, and/or refinished, I crave do it yourself (DIY) inspiration. Since I am home sick today and I don't have the brain-power for writing or the energy much of anything, surfing the web is a good way to pass the time in between naps. Here are two of my favorite decorating-focused blogs that make me want to get better quickly and make the most of the beautiful spring weather that has suddenly appeared...

The DIY Showoff is a great blog that features the writer's own home (their barn patio blows my mind!) plus DIY links and instructions from many other blogs.


Young House Love is a pretty well-known site about making the
most of a smallish house. I love this blog because our houses have similarities and it gives me hope for getting beyond some of the big issues we face in our house.

3.06.2010

From Trash to…Chicken Broth

Mmmm, isn't that an appealing title? Probably not.

The phrase, "Waste not, want not," is definitely one of my mantras so with my latest cooking adventure, I took unwanted food scraps and turned them into chicken broth. It took very little effort and is dirt cheap. So, here's what to do:

Collect

  1. Collect unwanted fatty chicken pieces. Whenever I cook with chicken breast, I like to remove any remaining white stuff. Whatever I cut off, I put in a freezer container. We use a Ziplock bag (a rare occurrence for us), but any sealable container will do. Just add the new meat on top of the frozen meat in the bag. Keep on collecting until you have a good amount. For me, this was a full pint-sized bag (about 1 ½ pounds of chicken scraps). Safety reminder: Do not leave your scrap bag out and do not add chicken pieces that have sat out. Despite my post title, don't treat your scraps like trash!

  2. Collect unwanted vegetable scraps. When I cut veggies, I throw the unwanted, but still kind of appealing parts into a freezer container (not appealing parts go into the compost pile). Carrot tops are great for this, as are celery leaves, the bottoms of green onions with the little rooty bits, etc. Be sure to include only things that are in good, edible condition: thoroughly washed, not rotten, etc. We use an old yogurt container for this.


Cook and Cool

  1. Defrost the chicken in the fridge or in a cool-water bath. (I was a bad girl and didn't do this. But, really you should. I will next time; I promise.)

  2. Get out your slow cooker. Add the chicken and veggie scraps.

  3. Cover it all with water. For me, this was 9 cups of water on top of 1 ½ pounds of chicken and a packed yogurt container of vegetables.

  4. Add a few extra items for flavor. The veggie scraps should provide great flavor, but ¼ to ½ of an onion, a hearty sprinkle of pepper, and some garlic will really make it yummy. We ran out of fresh garlic (craziness!) so I had to use dried, minced garlic. You also could add salt, but I prefer salting each recipe to taste rather than salting the broth.


  5. Cover and cook on high for 4 hours.


  6. Remove all big chunks of chicken and vegetables.


  7. Remove the crock from the housing, so it can get good air circulation around it. Let the crock cool down for 30 minutes or so. You want it to be cool enough to handle, but don't leave it out so long you violate the rules of the food safety "danger zone".

Clarify (the easy way):

  1. With the lid still on, put the crock in the fridge. Let the broth sit overnight or for at least 4+ hours until the fat has risen to the top and solidified. It will be opaque and chunky when sufficiently chilled. Use a slotted spoon, skimmer, or smallish strainer to scoop out the fat. This should be very easy. It is not, you might have tried skimming too soon. I got impatient and tried too early two times. It was a waste of time.

    (Too early; fat is clumping but it is still to early; fat is very white and clumpy--yay!)

  2. For very clear broth, let the broth settle again in the fridge. Then use a ladle to very gently scoop out the clear broth from the top without disturbing the sediment at the bottom. I was able to get out half the broth this way before I got impatient and moved onto the next strategy.

    Fat (mostly) skimmed off , sediment has resettled to the bottom leaving clear broth on top

  3. For less clear broth, use a strainer to pour the broth from the crock into another container. Try a cheese cloth for more thorough straining.

Store It:

  1. Portion the broth—I did 2.5 cup portions this time.

  2. Use within one week if in the fridge or keep it in the freezer for as long as you like to keep things in the freezer. Some say six months in the freezer for broth, but I'm not picky--as long as it has stayed at the proper temperature during that time.

Labels: ,