Rain Barrel Installation Part 2
The University of Rhode Island lists some great benefits to rain barrels:
- Rain barrels conserve water and help lower costs (a rain barrel can save approximately 1,300 gallons of water during peak summer months).
- Rain barrels reduce water pollution by reducing stormwater runoff, which can contain pollutants like sediment, oil, grease, bacteria and nutrients.
- Rain barrels can also be arranged to slowly release the collected rainfall to areas that can soak up the water, reducing stormwater runoff and increasing groundwater recharge.
Here is more on our rain barrel installation:
(See Rain Barrel Installation Part 1 here if you missed it.)
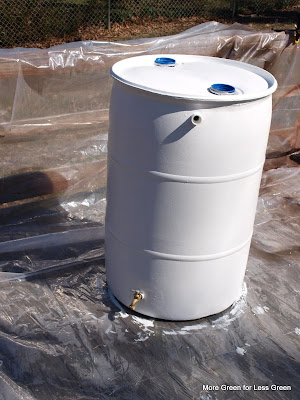
Installed!
We used cinder blocks (thank you Freecycle) to raise the rain barrel so the spout is high enough to fit a large watering can underneath (this factored into our measurements before we cut the downspout). I've been stalking Freecycle for trellising to put around the cinderblocks to hide them and make things look nicer.

Lesson Learned
Vertical cinderblocks are tippy. When our barrel got full and heavy, it went for a tumble (and even more of the paint is scraped off). We rearrange the blocks horizontally to be more stable.

The rain barrel fills up surprisingly quickly when we have a storm, so a full-size overflow spout keeps things moving. Also, we already have water issues, so we wanted to make sure the overflow was getting routed to the sewer as efficiently as possible.

Mosquito-Free Zone
Because any standing water can become a mosquito breeding ground, we pop these plant-and-wildlife-safe mosquito dunks into the barrel a few times per season. Technically, closed mosquito barrels, like ours, are not at risk for becoming breeding grounds, but I'm happy to be extra cautious and add the dunks.
Final Thoughts
Rain barrels are very low-pressure, so it is helpful to have two watering cans--one can fill up while the other is being poured on the garden. It would be great it there was some way to connect a rain barrel to sprinkler hose and get that to actually work, but I just don't think the barrel affords that kind of water pressure.
Yes, it takes some effort to fill up the watering can(s) to water the plants, but it just takes a few more minutes than dragging around a hose, and it is a good way to get in a little exercise, saves money, and can keep your lawn or garden growing strong during water rationing.

Remember, rain barrel water is not potable. Thoroughly wash produce grown with it before eating. Do not use rain barrel water for washing hands or swimming.
Want to make your own?
Here you go.
Or, if you live in the Northern Virginia area, check this out. At workshops in July and October 2011 you can build your own rain barrel for $52 or buy one for a mere $62.Labels: Gardening, Our House, Rain Barrel
posted by -Pamm @ 6:46 AM
2 Comments
![]()
![]()