More Green For Less Green

Living more eco-friendly for less money

8.07.2013

No More Cleaner Clumps

In green cleaning, I use several different powders: borax, baking soda, washing soda, oxygen cleaner (sodium percarbonate), citric acid. Some of these clump up in the humidity of our basement and are unusable. So, what's a green cleaning family supposed to do? Don't throw these products away! Instead, pull out your food processor and prepare for magic.

Step 1:
Dump the clumps in to a food processor fitted with the normal blade.
Some of the powder will get very fine and billow out of the machine. You may want to cover it with a towel.

 
 Step 2:
Whir away
Let the dust settle
Open the lid.
Step 3:
Transfer the powder into an air-tight container.
Also, you could pop in a packet of silica gel if you have one leftover from something else.
Those terracotta brown sugar bears (and other shapes) work, too.


Labels:

6.18.2013

Why Green Inside & Out? All of This Fun!

Cost and environmental impact are among the reasons why I switched to green greening our house inside and out, but as a parent I've discovered an added benefit: even the tiniest tot can get in on the action!

Inside, I feel comfortable with the kids being around our cleaners.. At 2.5, V is eager to spray and wipe everything he possibly can. While sometimes we just go with plain water, it is nice to really benefit from his eagerness. Baby E is still too oral to help that way (even green cleaners shouldn't be eaten), but I can tote him around on my back while I work without worrying about dangerous fumes.


Scrubbing the tub with green cleaners
The same holds true outside of the house. With a pesticide-free yard, our kids can go free-range: Baby E can explore on his own and eat a handful—or three—of clover or chickweed. Toddler V can play dump truck with grass clippings with his bare hands for an hour while I use the quiet reel-push mower right next to him.
 
Mowing Helper
Getting used to the feel of grass

Digging in the dirt pile in the backyard
With organic gardening, we get the fun of watering, digging, catching slugs, and eating veggies together. Everyone can lend a hand!
Square Foot Gardeners
 
Little Helper
 
Green cleaning looks different: things are clean, but not perfectly spotless. Green yards look different: we have more clover, plantain, dandelions, and chickweed than actual grass. But, the payoff is that we can enjoy them as a whole family more fully.
V & Dave 2012
E & Dave, 2013
Babywearing helps keep baby in on the outdoor action


Labels: , , , ,

5.04.2011

Make Your Own Kitchen Cleaner


Ingredients:
1 t washing soda
2 t borax
½ t shredded castile soap (Shredding tips here. I prepare several bars worth at once.)
2 cups hot water
Essential oils


Supplies:


16 oz spray bottle
Funnel
Skewer
Measuring cup
Measuring spoon (teaspoon)


Directions:
Add dry ingredients to bottle via funnel. Don’t worry about dry ingredients sticking in the funnel at this point. Add the water via the funnel to rinse the dry ingredients down into the bottle. If the mixture clumps and sticks in the funnel, use the skewer to break up the clog. Add the essential oils directly to the bottle, so none is wasted by sticking to the funnel. For the kitchen mix, I like 2 drops tea tree oil, 5-6 drops of sweet orange, and 2-3 of bergamot.

Shake before using. Spray and wipe with a dry cloth. For especially sticky spots, spray and wipe with a cloth saturated with clean, hot water.


Yes, it really works! I have been using this mixture for several years and it was part of The Big Clean when we bought our trashed foreclosure home.


(This recipe is based on the Castile Cleaner recipe found in the fabulous book Green Clean.)

Labels:

5.24.2010

Foaming Hand Soap

Making foaming hand soap is super-easy and saves money by lessening concentrated soap usage. While you can certainly buy a foaming soap dispenser from Bed Bath and Beyond, Target, or online, I've chosen to reuse empty disposable foaming soap dispensers gathered from others. I figure, why pay for something new when I can get life out of something that would otherwise go in the trash or recycle bin? From Freecycle I've received empty Dial Complete and Bath and Body Works foaming soap dispensers. The Dial ones work great; I haven't tried the Bath and Body Works ones yet.

The recipe is simple: 1 part soap to 9 parts water. I just estimate 1/10 of the volume the bottle will hold. More soap to water is fine, so don't nitpick over the amount. Personally, I use Dr. Bronner's Unscented Baby Mild Liquid Castile Soap which is vegan, fair trade, organic, and friendly to the water supply.


Squirt in the soap then fill the rest of the bottle with water, leaving enough space for the bulky pump to fit in. Voila!

Sometimes I scent each batch of soap using essential oils (start with 10 drops, but you may need even double or triple that you get the level of scent you want), but usually I just leave it unscented.

Labels:

4.19.2010

Glass Cleaner

I've used this uber-simple glass cleaner for years now with no problems. Then, I used it to clean the nasty, nasty windows at the new house and fell in love with it all over again.

Supplies:

  • Water
  • Vinegar
  • Spray Bottle
  • Bucket (optional)
  • Black & White Newspaper (at least a couple of weeks old)


Instructions:

  1. Whatever the quantity desired, use a one to one ratio: one part water to one part vinegar. For most jobs, mix the water and vinegar directly in the spray bottle and squirt on. For heavy jobs, mix the water and vinegar in a bucket. Heartily apply it to the glass with a cloth or sponge.
  2. With either method, wipe dry with the older, non-colored (or minimally colored) newspaper. The newspaper is abrasive enough to scrub off sticky grime but soft enough to leave a streak-free finish.
  3. Repeat if necessary.


Labels:

2.24.2010

Improved Homemade Dishwasher Detergent

I posted quite awhile ago about my homemade dish detergent (and why we use it over conventional) and how we were using it in spite of cloudiness. Reader Special765 suggested adding citric acid to the mix to help. That did the trick! It took us some time to get the amounts just right for our water conditions, but I feel like we finally have it perfected. Here is the new and improved recipe:

One Batch of More Green for Less Green Dishwasher Detergent
(Yields about 70 loads)

Dry ingredients:

  • 3 cups baking soda
  • 1 cup borax
  • ¼ cup citric acid*

Wet ingredients:

  • Essential oil (optional)
  • Vinegar

Mix dry ingredients in a container and shake to mix. Keep wet ingredients on-hand for each load of dishes.

Shake dry mix before each use and then open container pointing away from your face. Moisture causes clumping and activates the citric acid so make sure your container is air-tight. We got a container similar to this at a yard sale for $1. For extra protection, consider adding a dried out brown sugar bear (or the like) to absorb any moisture. I suspect any piece of terracotta will do.

For each load, pour the detergent to the lowest line on the dispenser cup (for us this is 1 tablespoon). Most people use too much detergent and go to the top of the cup, but more is not necessarily better— and is probably not what your machine's user manual suggests. If 1 tablespoon is also the right amount for your machine, one batch of this detergent will last for 70 loads.

I add 2 drops of essential oil per load on top of the dry mix. Generally I use tea tree oil, which has natural antiseptic properties, but if I'll be in the kitchen I'll put in a smell I really love like bergamot or sweet orange since the scent will be released in the steam that comes out of the machine.

I've stopped using the rinse-aid compartment for vinegar. Instead, I put a healthy squirt of vinegar in the bottom of the dishwasher (between 1/8 and 1/4 cup). I use an old, plastic sports bottle with squeeze top for this. It is so handy to just grab and squirt! Adding more vinegar than the rinse aid dispenses seems to do the job better. My bottle is similar to this. Used ones are abundant and dirt cheap or free, so no need to buy new plastic!

This mixture is just right for the water in my area, but you may need to play with the ratios for water conditions in your area.

*To find citric acid locally check at an Indian grocer (probably the best chance for a good price, since they will likely sell by the bag and not in a pricey brand-name bottle). Also try specialty supply shops that sell things for making cakes, candy, soap, or cheese; or try a health food stores (e.g.Healthway, but it is pricey there). You also can buy it online.

Labels: , , ,

2.10.2010

Mold Abatement in the Basement

Mold can be serious business, but I think that the hysteria about it enters the realm of being big business. Mold education is always a more effective first step than panic. Because the house we bought has some moisture issues, I looked into educating myself about mold and moisture problems and found some excellent resources that helped me feel very good about managing things in our new place.

First, I read A Brief Guide to Mold, Moisture, and Your Home, a PDF from the U.S. Environmental Protection Agency (EPA). Then I took an online mini-course: Introduction to Mold and Mold Remediation for Environmental and Public Health Professionals from the EPA. I was able to complete all 9 chapters and all of the tests in one night. (This course is for general education, and is not a certification.) The EPA also has this great chart for cleaning. Home Depot and others sell mold kits, but proceed with caution. Mere traces of mold spores are expected; mold is all around us outside. Indoor mold growth (beyond a small, normal amount like in the fridge or bathroom) is really the problem.

Many people think that bleach is the default mold cleaner, but this is not correct. While bleach is an effective mold killer on non-porous surfaces, it is not effective on porous surfaces. In other words, it will kill mold on a tile floor, but unless your grout is sealed that makes part of your floor porous. Drywall is also porous. I don't think bleach is best for anything ever so I wouldn't even consider it for non-porous surfaces. Hubby uses it to clean his home brewing supplies and won't change his ways, but I personally don't ever use it. Here is some more info on bleach & mold and why bleach is not the best choice.

So, with bleach out as an option, what is left? Here are the steps that we took:

  1. Find the cause of the moisture and abate it You will just have to keep repeating the following steps if you don't take care of the problem. Our problems were: ineffective gutters dumping water on the foundation of the house, an against-code plumbing system creating huge amounts of moisture, and previous owners heating the basement via dryer venting, which is moist heat.
  2. Get your gear on Use the EPA's cleaning chart (linked above) to assess the gear that you need. For our level of mold I wore rubber gloves, a mask, and glasses. I also elected to wear long pants and a long-sleeved shirt that would be washed right away.
  3. Give a topical cleaning The vinegar spray I've mentioned in the past is good for light mildew (like in the bathroom). So first we sprayed and wiped the walls with that: Scented Vinegar Spray: 1t borax, 1T shaved dry castile soap, 1/8c vinegar, 2c hot water, 5-10 drops of essential oils (Green Clean p.136). I suggest making half of the oil drops Tea Tree Oil since it has natural antiseptic properties.
  4. Kill the mold and clean topically again I made blend of hot water (1/2 gal), vinegar (1/2 gal), and borax (1 cup)* and wiped that on the wall with a sponge and let it sit for 30 minutes. Don't be afraid to get things really wet (provided it is warm and dry enough in the room for it to dry within several hours.) Then I reapplied and waited for another 30 minutes. Then I wiped one last time with just hot water, really scrubbing this last time. I used a wet/dry shop vacuum to dry up floor. *I made smaller batches that that, but for simplicity's sake I've provided the recipe in a 1 gallon quantity. I used my green cleaning books along with this site to devise that solution and timeline.
  5. Seal the wall and cover the stains Mold can stain. Even if you've removed and killed the mold, you may still have staining. So, it is time to cover that up and seal the wall. We used this primer-sealer.

    About primer: zero VOC primers are easy to find, zero VOC primer-sealers are not. Zinsser makes a zero VOC primer-sealer option, but it is not available in my area, so we went with the conventional kind that I linked to. Zinnser's conventional latex primer-sealer actually is low VOC, they just don't label themselves as such. (Most latex paints are low VOC but are not labeled as such. Read this to learn more about what qualifies as low VOC and then check the MSDS sheet for your favorite paint.
    Beware, however, of oil-based paints labeled as low VOC. A low VOC oil-based paint can have about three times the amount of VOCs as a conventional latex paint. I learned that the hard way. We bought 5 gallons of oil-based, low VOC Kilz primer-sealer. After using it for a weekend and it stinking up the place, we switched to the Zinsser and sold the Kilz on Craiglist. I can't believe I made that mistake and got hoodwinked into using something because of the label instead of reading the MSDS.

The step I didn't mention, because we didn't do it, is removal. Also wearing the proper protective gear, removing pieces of flooring, drywall, etc. is certainly an option—and the best option in some cases. We looked at one house and the basement had black, moldy slime that had grown up from the floors, onto the walls, and up as high as the light switches. That was not the house for us! That house needed every single thing removed from the basement.

We are at about 3 months out and none of the mildew has returned! On to the pictures…


Before--Large Room in Basement
Mildew is primarily from the gutters not working and thus water collecting near the house. Plus we've got general filth and ickiness down there. In these pictures, brownish spots are filth, blackish spots are mold. The room has much more grime that it does mold. But, it still has to be dealt with.


After Mold Remediation
Walls: after steps described above. Floor: cleaned with Murphy's Oil Soap and my mother-in-law's amazing floor electric scrubber. The goal was to get it clean enough for the movers to put down boxes. At some point, all of the flooring in the basement will be replaced. I would like to do it soon, but we have bigger priorities and an area rug can help cover it up.


Before--Other side of the big room in the basement (leads to the second kitchen which is a scary place that we have only done demo work in)


After Mold Remediation
(The stairs are very ugly because of chipped paint. I just brought home floor paint samples to decide on for painting them. Yay!)


Before: Other view of the big room and the craft closet


Before: Close up of the craft closet. This is the worst mold in the house. We'd seen much, much worse in other houses so we weren't daunted by this. But, it is certainly was enough to indicate a water problem and enough to warrant careful abatement. The mold here is from toilet leak in the bathroom on other side of wall that went on for so long and was extreme that the moisture rotted the bathroom subflooring and rusted everything metal nearby. Someday I'll share those scary pictures.


Craft closet after mold remediation (including priming)


Unpacking in the craft closet


Unpacking in the big room. The basement is not heated, so we haven't done much down there but unpack some things and make sure that everything is up on blocks and nothing touches the walls until we make it through a few more months with no moisture problems. So far, so good! In theory, we could play video games down there now (that is what it is set up for) but it is too cold.

Come summer, hopefully it will feel refreshing down there and we'll start some real work.

Labels: ,

1.30.2010

Eco-Friendly Area Rug Cleaning – For Free!

If you live in Northern Virginia, today you can get your area rugs naturally "dry-cleaned" for free today thanks to the snow! Any time it dry-snows (meaning the snow is sugar-like in appearance and cannot form into a snowball) and the temperature is below 25° F you can take advantage of nature's special natural cleaning power and use the snow to clean area rugs. Honestly, in NoVa I don't think these conditions converge very often. I have been interested trying snow cleaning for several years and it just has never worked out for one reason or another. But, today is the day!

I learned about snow-cleaning from one of my favorite books, Organic Housekeeping: In Which the Non-Toxic Avenger Shows You How to Improve Your Health and That of Your Family, While You Save Time, Money, and, Perhaps, Your Sanity by Ellen Sandbeck. (What a great title!) Snow-cleaning has long been used for very fine wool and silk rugs, but it should work for any rug. I decided to try it out with my beloved Turkish rug, which hasn't been cleaned, as far as I know, (besides vacuuming) since we bought it in Turkey circa 1987. Yowza!

Here's what to do:

First, you need to cool off the rug so it doesn't melt the snow when you lay it down. Roll up the rug and put it in a cool (preferably unheated) area of your house for a few hours. Once sufficiently cooled, take it outside and lay it pretty side down (this is actually called pile-side) on the snow. I put mine on the snow-covered back porch. Beat the underside of the rug (which is facing up) with a broom. You can also stomp on it, but as a child I was fascinated by the Turkish ladies beating rugs hanging from their balconies, so beating was the obvious choice for me even though this rug was on the ground. Beat, beat, beat or stomp, stomp, stop. Then pick up the rug, put it in the fresh snow of a different spot and repeat. For me, the initial beating spot wasn't black or anything so dramatic, but there were lots of hairs and a sufficient amount dirt, etc. Repeat beating/stomping and moving the rug until the snow underneath remains clean enough to your liking.

Then the tricky part—cleaning the snow off the rug before bringing it in. Ellen makes it sound so easy, "6. Sweep the snow off the rug 7. Roll the carpet up and bring it inside" (252). It was not quite so succinct for me.

I flipped the rug over (pile/pretty-side now up) and swept the snow off the rug. That part was fun and easy, but the snow kept falling on it. If you have a covered area (with clean ground), I recommend moving there. I swept off the snow in one part as best as I could, then rolled up the rug a smidge, then swept the newly exposed part of the back-side, then swept a little more of the pile-side, then rolled a little more, etc. until the whole rug was rolled up. I am not particularly coordinated so this part was rather awkward for me. Having a second person to help with this step might make it as easy as Ellen suggests it is. Alas, hubby is out today—so I de-snowed the rug alone. I got off as much snow as I could and then brought the rug inside for one final sweep-off in the basement. Unfortunately, even in our mostly-unheated basement it was warm enough to melt the small amount of remaining snow. So, my rug ended up ever-so-slightly damp. Since the aim is to keep the rug as dry as possible, really, really try to get off as much snow as possible outside.

Right now I have the rug hanging over the shower curtain rod in the bathroom to let it air out (it isn't dripping or anything). It looks great—the colors really pop again— and I can't wait to put it back in place later today.

Labels:

1.05.2010

The New House--Part 1


I’ve been absent for a while on the blog, but with good cause. We bought a house in November and have been working hard, hard, hard to make it livable! We started our housing search in January of 2009 with some strict, but not totally unreasonable guidelines: single family home, 3+ bedrooms, 2+ baths, a yard with potential for vegetable gardening; a fireplace and dining room would be nice. We knew we wanted a small house—lower utility usage (and bills), less space to fill, cheaper to make eco-friendly upgrades because things just aren’t as big, etc. We also knew we wanted to live in a very specific area near our offices. Because of the size we wanted, that left us with only about four neighborhoods, albeit rather large neighborhoods of homes that were built from the late 40s to the early 60s. Oh, and it had to fit our tight budget. So, maybe not such an easy thing to find…


Over nine months we looked at over 50 houses and put offers on 11 of those houses which breaks out as 5 foreclosures, 3 short sales that we were outbid on, and 3 short sales that we “won” and entered the long, frustrating process for. We ended up with house number 11—a foreclosure that had been vacant for just 1.5 months. Built in 1954, it was made very solidly with brick and old wood that lasts forever and just isn’t around anymore. It has three legal bedrooms on the main floor, one illegal one in the basement, two bathrooms, a fireplace, dining room, two kitchens, and a great yard. It also had some downsides—some big, some small: writing on the walls, a little mildew in the basement, a raging cockroach infestation (and thus droppings over every surface), a putrid smell, neglect.
We—and a team of generous friends and family plus some professionals—worked for three weeks before we moved in to get the house livable. We came to the work with four major mindsets:


  1. Focus on livability not aesthetics (at this point). We want to live in the house and see how it feels before deciding to make changes. For example, we want to learn the ins and outs of how our water pressure works before doing a grey water system. We want to watch the sun over the seasons before deciding if we want to save up for solar panels. This also allows us more time to find used things that we really love, like a neat lighting fixture for the bathroom.

  2. Preserve as much as possible We don’t believe in updating just for the sake updating. So, the turquoise tub stays, the floorboards with staining don’t get replaced, we spray-paint the brass fireplace façade instead of replacing it.

  3. Make wise purchasing choices We try to buy used things first and borrow things that are borrowable (like tools), and then buy low-impact products when we must buy new. When we do buy conventional, we do it with a well-thought out reason and occasionally we allow ourselves a fun, conventional splurge (the new shower curtain that I adore) but that is the exception, not the rule.

  4. Green clean We hired a green cleaning company to get off the first layer of filth and clean out the dead bugs and then did all remaining cleaning with homemade green cleaners. We did all mildew remediation with vinegar and borax.


We’ve had some great ups (the dishwasher we thought was broken actually wasn’t, friends and family who were AMAZINGLY generous with their time) some downs (small hole in the roof, the heat breaking two days after we moved in) and we’ve got lots of work ahead of us, but it feels good. Here’s a bit of our journey told through pictures with commentary…


Before: Our adorable home. It has tons of potential, but tons of work to do! To start, we've got mushrooms popping up in the front yard from a tree stump decomposing. The paint on the fascia boards is in bad shape. The gutters are cracked and worthless.

In progress: The previous owners removed a satellite dish but didn't plug the holes. This rotted out the soffit, fascia board and a joist. All of the fascia boards needed to be scraped and painted, but most were in great condition (yay 1950s construction old growth wood that is still trucking on).

After: New gutters, painted fascia boards, some roof repairs, stump removal, and a fresh blanket of snow!


The first time we saw the house the electricity wasn’t on and we though the house had a mold problem because of the black everywhere. On our second visit (the inspection) we had electricity and realized it was cockroaches—dead and alive— and their droppings. Yuck!

Check out the corner of the front door. Yes, they are cockroaches and yes, they are alive. Many of their dead friends were also around. We asked for an exterminator in our addendum.


That is dead, smashed bugs. Every place where two surfaces touched was covered in either cockroach bodies or their droppings. The house had only been unoccupied for 1.5 months at that point, so people obviously had been living in this.

We had professional cleaners (an eco-friendly cleaning company) for 5 hours plus many, many additional hours from family & friends & us.


We used all eco-friendly homemade cleaners from the book Green Clean. We spent three weeks living in our old place while we fixed up the new place. Until we had a sufficiently cleaned surfaces to set stuff down at the new place, each night I would take the empty
bottles back to the condo to reload for another day of hardcore cleaning.

The green bottles are for the kitchen and contain a degreasing formula (Castile Cleaner: 1t washing soda, 2t borax, 1/2t castile soap*,
2c hot water, 10 drops of essential oils, Green Clean p.136).

The pink bottles are a mildew-buster formula with vinegar for bathrooms and the basement (Scented Vinegar Spray: 1t borax, 1 T castile soap*, 1/8c vinegar, 2c hot water, 5-10 drops of essential oils, Green Clean p.136).

*Shredded castille bar soap, not liquid. See this entry on how to shred bars easily. I suppose you could use liquid, but it forms creepy, greasy globs when mixed with vinegar so, I stick to the bars.

I’ve lived by these Green Clean recipes for almost two years now, and they pulled through for us on this mega job! If we could green clean THIS, anything can be green cleaned!

I am tempted to finish this blog entry here, but I'm afraid you will think we are totally crazy and disgusting for living in this house if I don't show you some real "after" pictures. Because I am obsessed with my new shower curtain, let me show you the bathroom. (Bonus: if you know me in real life and have already seen the picture album, at the end is a new picture you haven't seen!)


Bathroom Before:Rotting window sill, cracked floor tiles (not visible), general ickiness, then we discovered bad plumbing in the sink and that the vanity was rotting.

Ickiness Close Up


Bathroom progress: Damaged vanity and sink faucet removed, cleaned (several times), and a lovely new hand-crafted window sill (inside and outside)installed. The sill now has an angle to it so water won't collect plus it now has exterior paint on it. My dad headed up the window sill project. It seemed like tedious, precise work but he did an amazing job. Go dad! (And thanks to my mother-in-law for cleaning and my father-in-law for patching and painting the stained, crumbling ceiling.)


Vinyl lining added to lower part of window for privacy. Ick, plastic! But, this was a place where it seemed the best option. We bought the vanity new and while it looks great, it bugs me that we bought something new out of pressboard. Oh well. You can't win them all. On to happier thoughts: I adore this shower curtain! I wanted something to tie in the green and tan towels we already have but also work with the turquoise tub. You can see it better in the next pictures. (Update: It is from Target.)


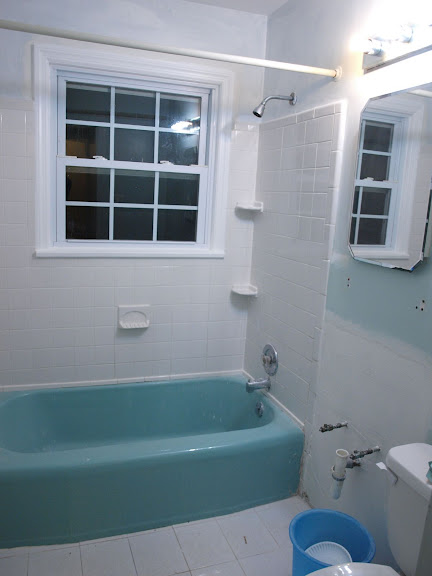
Bathroom after: Painted Gold Buff (Olympic zero VOC paint), vintage lighting fixture and lightly used towel rack both purchased from the Habitat for Humanity ReStore installed, used eterge purchased from family member installed (not visible in the picture). The faucet is new, but we splurged for solid brass in hopes that it will last a lifetime.

Still to do: fix the things the picture doesn't show--the cracked floor tiles need to be removed, proper flooring support added, and new flooring put in. The ceiling will need to be replaced. It was in bad shape from a past ceiling leak and our patch job is already falling apart because of the moisture.

See...the grossness can turn into something adorable! I look forward to sharing more with you.

Labels: ,

3.16.2009

9 Changes for 2009- #6 Laundry Detergent

  1. Cut out commercial breakfast bars
  2. Cut out canned beans
  3. Ditch premade hummus (and all those containers)
  4. Use only environmentally friendly dish detergent
  5. Shop Used First

  6. Use only environmentally friendly laundry detergent
    (my preference is homemade)

I've already blogged about homemade eco-friendly laundry detergent here (with additional pictures here). But now, four months into using it, I can report back that it works, it really works! We haven't had any problems and that first batch I made has lasted us until now. As I get ready to whip up some more I am weighing reusing the milk jugs and hosing to siphon it in versus using a five-gallon lidded bucket from Home Depot. I've been on the search for a used bucket, but old ones seems to all have had paint or food in them previously, which I am not keen on. The thought of pickle-scented laundry soap makes me just ill.

For newcomers, here is a quick summary of why to consider eco-friendly laundry detergent:

Pretty much all conventional laundry detergents also contain phosphates and bleach, like dishwasher detergent does. (Read the issues with them here if you missed that post.) Most conventional laundry detergents also contain non bio-degradable, petroleum-based ingredients. I bet you picked up on the first problem right away: non bio-degradable. That means it doesn't disappear when it goes down your drain. Realizing that water facilities simply cannot clean out every single thing from the water, and the fact that the stuff they do clean out has to be disposed of somehow was huge wake up call to me. Previously, it had really been out of sight—down the drain—and out of mind for me. But, that simply is not reality.

Then there is the big issue that petroleum is a non-renewable resource. I think we all know what that means since petroleum is hugely politically charged. Reducing American dependence on foreign oil is something we can hear on the news every single day, as are finding new places to drill and the ethics of if we should drill in those places.

Traditional detergents in the US also tend to contain ingredients that have already been banned overseas because of their impact to the environment or personal health, bleach, and artificial fragrances which may exacerbate allergies. (Remember that you can always look up the safety sheet for your favorite detergent here.)

In addition to checking out my previous entries, fellow blogger Kath has some interesting things to say about her experience with making laundry detergent. Check it out here.

Labels: ,

1.12.2009

9 Changes for 2009- #4 Dish Detergent

This entry is part of a series on changes I made in 2008 that I want to stick with in 2009…


  1. Cut out commercial breakfast bars
  2. Cut out canned beans
  3. Use only environmentally friendly dish detergent
    (homemade to boot)

    Why…

    So question one is why an environmentally friendly detergent even matters, right? Most conventional dishwasher detergents contain phosphates and chlorine. Phosphates seriously impact our water supply by encouraging excessive algae growth which kills fish and plant life. Chlorine bleach is an environmental pollutant and it may cause immune and reproductive system problems. Now, I am not alarmist about many things, so the possible concern about bleach doesn't faze me too much. But, the dangerous chemical reaction caused by bleach mixing with ammonia that we've all been warned about since we were kids is undoubtedly of concern. Ammonia is a more eco-friendly choice, so I'd just as soon stick with that one and keep out the bleach.

    Here's what we did…

    We made our own. We started off by using a recipe from Green Clean of 1 part borax to 1 part washing soda. We put 1 heaping teaspoon of the mix in the release cup and vinegar in the rinse aid. We started off using 2 tablespoons of the dry mix, but that made the dishes cloudy, so we cut down until we got the right amount for our water. But, we were having issues with cloudiness and chunks of food remaining. So onto blend two…

    Our second attempt was 3 parts baking soda to 1 part borax along with the vinegar in the rinse aid compartment. With this mix you use just as much as you would with a conventional powdered detergent. I read the instructions for the dishwasher to refresh my memory, and it turns out that we've long been putting in too much: the lowest line on the cup is ample for normal loads. We also add 2 drops of essential oil per load on top of the dry mix. Generally I use tea tree oil, which has natural anti-bacterial properties, but if I'll be in the kitchen I'll put in a smell I really love, like bergamot or sweet orange, since the scent will be released in the steam that comes out of the machine.

    We've stuck with this second blend for many months now. I use an old 32 oz yogurt container to mix the powder (measure and dump in, put lid on, then shake to mix). I only need to make up a new batch every other month or so.

    I will be perfectly honest and say that we are still dealing with cloudiness. We've taken to wiping the dishes with a slightly damp cloth as we put them in the cabinet to fix this problem, but I know that cloudiness simply is unacceptable to some people. Some days it bothers me and I consider trying out Ecover or another similar green product, but most days I love that it is so much cheaper than anything else. My price per year is about the cost of a single box of brand name commercial dishwasher detergent. Even if we go to a commercial product, I am committed to staying away from dish detergents with phosphates or chlorine bleach.

    UPDATE: See my improved (dare I say, perfected) recipe here.


Labels: , , ,

12.15.2008

Green Secret Santa


The Secret Santa exchange at work was green-themed and I had loads of fun with my gifts. We gave reusable produce bags from Etsy (AMK Designs http://www.etsy.com/shop.php?user_id=5692686) and then a homemade green cleaning kit than I made. I made everything in it, so I hoped the person who got it would appreciate it-- and they did. Yay! My husband got a tiny pine tree that we can grow indoors until we have yard to plant it in and I got a coupon for my artsy coworker to do a sketch of any 4x6 picture I give her- awesome! Here is what I put in the kit:

Unpaper Towels
Use these handmade extra-thick cloths for cleaning or as napkins. The small size is to encourage you to do one-use-and-wash, just like you'd use a paper towel one-use-and-toss.

Kitchen Cleaner
This castile cleaner is great for dealing with greasy stains (normally found in the kitchen) but it can be used anywhere in the house. I've added some tea tree oil which has antiseptic properties. The hot water melts the shaved castile soap in the dry mix, but you only need to add it once. Give the bottle a good shake before each use to remix everything. This mix will last indefinitely. The recipe on your bottle comes from the book Green Clean. Your bottle holds 1½ batches.


Bathroom Cleaner
Because of the vinegar content this blend is great for dealing with mildew normally found in the bathroom but it can be used anywhere in the house. I've added some tea tree oil which has antiseptic properties. The hot water initially added melts the shaved castile soap in the dry mix, but you only need to add it once. Give the bottle a good shake before each use to remix everything. This mix will last indefinitely. The recipe on your bottle comes from the book Green Clean. Your bottle holds 1½ batches.


Liquid Laundry/Dishwasher Detergent
Give the container a good shake before each use to remix everything. Use 1/4 cup per load in a traditional washing machine, 1/8 cup in a high efficiency. If you are especially brave, use 1/8 cup per load in the dishwasher. Put white vinegar in the rinse aid compartment. You can add two drops of essential oil to the soap cup along with the mix, and when it opens during washing it will fill your kitchen with the smell of the essential oil.


Hand-Milled Mint Lather Soap Ball
This soap ball uses unscented, vegan, fair trade soap as its base along with super moisturizing natural oils. It can be used to cleanse over-dry skin, or instead of shaving cream during shaving, or as a shampoo. This recipe comes from the book Beautiful Handmade Natural Soaps: Practical Ways to Make Hand-Milled Soap and Bath Essentials.


Hand-Milled Milk and Honey Soap Bar
This soap ball uses vegan, fair trade soap as its base along with milk and honey and essential oils. It is great for bathing or washing hands. This recipe comes from the book Beautiful Handmade Natural Soaps: Practical Ways to Make Hand-Milled Soap and Bath Essentials.


Bath Bombs
Drop one of these into your bath and watch it fizz! The fizzing ingredients clean you (and do good things for your hair cuticles if you're laying back in the water) while releasing a light scent. Yellow is sweet orange; green is eucalyptus, tea tree, citron; blue is bergamot. This recipe comes from the book Beautiful Handmade Natural Soaps: Practical Ways to Make Hand-Milled Soap and Bath Essentials.


Reusable Shopping Bag
Okay, okay I didn't make this one. Keep a stash of reusable bags in the car with you so they are always on hand. Use them for groceries as well as retail shopping. If possible, keep them in the front seat of your car so you can always see them. It takes some time to get in the habit, but is worth it! As a fun added bonus, several grocery stores give a 5 cent credit per bag you bring.

Labels:

11.09.2008

Laundry Soap Close Up

Close up picture of the soap separation. This will begin even as you move it from the pan to storage. A good stir (or shake, in my case) will remix it.

Labels: ,

Homemade Laundry Soap


Left Image: Left jug is recently shaken and mixed.
Right jug is unshaken and has settled into soapy layer and watery layer
Right Image: When mixed right before use, the laundry soap is creamy and slightly bubbly


After trying several batches of dry laundry soap, my husband asked me to make a liquid one. The liquid/gel I made is #1 from this great website, Tip Nut. We are very happy with the way the soap works. We now use it for all of our laundry and have successfully used it at all wash temperatures. The three dry recipes we tried were Tip Nut #4, Tip Nut #9, and a mix of half borax and half washing soda. While the dry ones all seemed to work equally well, my husband prefers liquids laundry soap/detergent. Since he does the laundry, I am happy to whip up whatever works best for him!

In my pictures you can see that I have the laundry soap in milk jugs. I do not recommend this unless you have hosing available to siphon the cooked soap from the pot through the slim necks of the jugs. Since my husband homebrews, we did have a suitable plastic tube, but this ended up being messy, frustrating, and time consuming as the liquid congealed into a gel. Stick with a bucket! The soap will separate and requires stirring or shaking before use to remix the water (which will settle) and the soap gel (which will float). In the picture on the left, the left jug is recently shaken and mixed, the right jug shows the settling and separation.

n.b., Homebrewing husbands may not be thrilled with such use of said tubing since soap makes beer go flat. Eeek!


-------

Why in the world I would make my only laundry soap? For us, there are four answers to this:

Environment – Environmentally, making my own laundry soap is a good choice because it doesn’t require an endless cycle of new packaging production, shipping, and disposal/recycling. Also, most commercial liquid detergents have petrochemicals in them. Not only are petrochemicals bad for the water supply, but they use petroleum which is a non-renewable resource and is so very politically charged right now. Here is a link on Dr. Bronner’s Soap (eco-friendly, organic, and fair trade) which is the soap I use in my cleansers and laundry soap: here.
This site lists many names for petrochemicals that you might see in the ingredients list of your soap/detergent (should the manufacturer actually disclose what is in their product).

Health – My husband has contact dermatitis so artificial fragrances are bad for his skin. The artificial colors, scents, and additives in most commercial detergents are of concerns to many people. Personally, this is an area that I approach with caution, but am not alarmist over. Look up your favorite detergent here so you can make a decision about what is best for your home.

Cost – Making laundry soap is dirt cheap. Though I personally have not calculated the cost, others who use similar recipes cite $0.03 per load. For me, the low cost is just an added bonus to the more important reasons above.

Fun – For me, stuff like this is an enjoyable hobby that yields a usable result just like cooking, homebrewing beer, etc. I find it fun and I like the whole “science in action” aspect.

Labels: , , ,

7.18.2008

Paper Towel Alternative


Eight months ago we decided to phase out paper towels in our house and switch to one-use-and-wash cloth towels. To maximize the eco-friendliness of this move, we wanted to repurpose something that we already had rather than go and buy a new cloths from the store. Enter my husband's old, holey T-shirts.

I started by cutting down each side seam, then cutting out the sleeves. With the shirt in more manageable chunks I was able to start cutting it into useable pieces. I decided that I wanted each cloth to be the size of 1/2 paper towel. This size is big enough for most clean-up jobs, but small enough that we aren't tempted to reuse them (and thus spread harbored bacteria).

Storing the cloths in discreet way was important to me. I didn't think a big wad of rags, even clean ones with a noble purpose, would encourage my husband to stick with it. So, I decided to use a small canister. While it is easy enough to just lob the cloths in there, I like a more streamlined approach. I stack all of the cloths, then invert the pile and push it in the canister so that just one cloth is visible (like how a box of tissues is packaged). That way I can grab one cloth without taking seven others out.

Once a cloth is used, it goes in an open plastic basket in the laundry room. Note that the holding area must be an open container (and be sure your wet cloth isn't balled up when it goes in) otherwise you will end up with a seriously stagnant stench. Blech!

In our house, white cloths are for kitchen jobs and they can get washed with any towel load. Any cloth made of colored or patterned cloth is for outside or bathroom cleaning. They have their own separate basket in the laundry room and get washed by themselves. (If you use cloth diapers or pads you could add these to that load). Honestly, I don't know if laundry cross-contamination is a legitimate concern or not, but I'd rather not risk it.

Labels: , , ,

6.19.2008

Saving With Green Cleaning and Beauty

For beauty and cleaning supplies, if you simply replace traditional commercial products with commercial eco-friendly products it really will hit you hard. You have to go into the green with a mentality of consuming and buying less.

One-for-one product replacement misses the point of going green since even the eco-friendly commercial products still come in plastic bottles, require shipping, and generate waste (or need to be recycled which uses energy).

Here are some ideas that might be worth trying: Can you use olive oil instead of lotion? Can you shampoo half as much as you do now? Can you make your own cleaning supplies for cheaper (with the added bonus of less packaging)? Can you buy castile soap in bulk and then use it for many things (from cleaning your home to cleaning your face)? Can you use baking soda instead of deodorant (just rub a generous pinch into each pit)?

Now, let’s move onto green cleaning specifically. I suggest reading the books Green Clean and Organic Housekeeping if you are serious about this kind of cleaning. OH talks about the science of cleaning and how it works (which makes you feel that you really can clean organically, if you are doing the right things) and gives some recipes. GC gives lots of recipes and is more anecdotal in tone.

Here are some common ingredients and where I found them (in Northern Virginia).

Washing Soda
If your grocery store doesn't have washing soda then request it! Barring that, you can get washing soda at Amazon or look for "PH Up" at a pool supply store. Get it for hot tubs and not pools as the pool kind tends to have other things added. Another place to look is an aquarium store since fish tanks need to have their PH changed. You want it to say 100% sodium carbonate on the label. It is also known as soda ash. It will be quite pricey at a pool store, though. I paid $8 for 1 pound at a pool store before I found it at a grocery store where it was $3 for 4 pounds.

Borax
I found borax at Wal-Mart in the laundry aisle. The brand I've seen at several places is called 20 Mule Team. It is also available on Amazon.

Fels Naphtha Soap
I haven't been able to find Fels Naptha Soap locally. Amazon sells it by the bar or in a package of thirty bars.

Instead, I decided to go with Dr. Bronner’s which they sell at Whole Foods. This will make a much milder product than the Fels Naphtha would. I currently am using the unscented/baby variety.

Most dry recipes call for grated soap, so I used our food processor to grate it into a chunky powder which I store in a jar.

Baking Soda
Baking soda in normal quantities can be found at any grocery store. I think I got my 4 lb box of baking soda at Wal-Mart in the laundry aisle. At work they have a twelve pound resalable bag of baking soda (probably from Costco), which I covet.

Vinegar
White vinegar can be found at any grocery store. The longer your jug lasts you, the longer between consuming plastic bottles, so the bigger the better!

Storage Jars & Spray Bottles
All of our dry cleaning mixes are stored reused jars. Containers that cannot be recycled are particularly good for this since otherwise they would just go in the trash. (We have a few #7 plastic ones.) Our spray bottles are from Wal-Mart and Dollar Tree. Some people save the spray bottles from commercial cleaning products to refill with their new homemade cleaners. Personally, I am hesitant to do this.

Labels: , , ,

6.11.2008

Non-Food Products Grocery Savings

    Cleaning Supplies

    Moving to the dirt cheap organic homemade cleaners is cutting our costs, for sure (see green clean tagged posts). There just are a few basic, cheap ingredients required. Baking soda and vinegar are readily available and cheap. Borax is also readily available once I started looking for it (also cheap). Soda Ash/Washing Soda/Sodium Carbonate (three names for the same thing) was hard to find at first. From a pool supply store I bought Hot Tub PH Up which is the same thing with a fancier name (not to be confused with Pool PH Up which contains other things). It was rather pricey $8 for 1 pound. After awhile, though, I was able to find it in the local grocery store at 3 pounds for $2.49. A much better price!

    I suggest the books Green Clean, and Organic Housekeeping: In Which the Nontoxic Avenger... to get started on green cleaning. They will tell you how to do it and why conventional products aren't all they are cracked up to be. (Be extra cheap and check your library for them instead of buying them.)


    Laundry & Dish Soaps & Detergents

    Take a look at your soaps and detergents. Are they concentrated or say use one third less or similar? If so, the good news is that your product probably uses less packing than traditional ones. Yay! The downside is that in reality it is hard to use one third less. How exactly one can use one-third of a squirt of dish soap is a mystery to me. In this case, just be aware that your soap is super-concentrated and overusing it is literally putting money down the drain. So, stick to just one light squirt or add water into the bottle and shake to thin the soap out.

    Soap & Shampoo & Razors

    As for soap and shampoo, I always put them on my birthday and Christmas wish lists. Yes, that sounds strange, but hang with me...while my family thinks giving normal soap, etc. is lame, they are just fine with getting me fancy ones from Lush or the like. I am loaded up on fancy soap for probably two years after this past Christmas! Same thing with shampoo. While I am fine with cheap shampoo, my mom thinks it is girly-fun to buy me special shampoos. I go with it ;) I haven't bought razors in years. I either get them as stocking stuffers or I also take advantage of "free after rebate" razor offers in the weekend coupons.

    Ladies Only

    If menstrual products seem expensive to you, consider a Diva Cup (about $25 for 10 years worth of no tampons is a beautiful thing to some people). Want to go even more hardcore cheap? If you are crafty and have scrap fabric, make cloth pads or liners (you can also buy cloth pads from Etsy). If this stuff is not your style, that is A-OK with me. I'm just the idea lady!

    Labels: , ,