More Green For Less Green

Living more eco-friendly for less money

8.12.2013

Me Versus the Yellowjackets

Our front garden is a haven for pollinators this summer, and we are thrilled! In early July, though, we noticed an influx of yellow jackets. I wasn't too fazed until one day I noticed dozens of them clustered near the path to our front door.


Upon closer inspection, I realized that they were zipping in and out of a hole in the ground. As I searched for information, I learned that yellow jackets have underground hives (sometimes huge ones), they can sting victims repeatedly, and they get more aggressive as the summer wanes. In other words--we were in trouble. How could we get rid of these creatures without spending loads of money and keeping green?

On the internet, the most popular suggestion was to pour gasoline into the hole. No way! Keeping our lawn a chemical-free play zone was key. This method is illegal, dangerous, and can have long-term consequences for the ground and its inhabitants. Rigging hornet spray on to a pole and putting that into the hole was another common suggestion. That seemed  complicated, dangerous, and we were worried about what that would do to our lovely organic veggies.

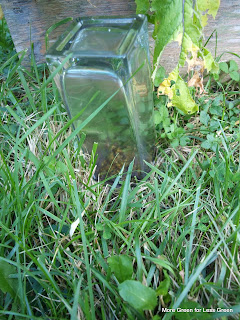
Ultimately, we decided that capping the hole with a glass vessel would be the easiest, safest, and cheapest tactic. The theory is that no wasps get in our out so the colony starves plus the glass creates a killer hotbox. But, would it work?  Since the yellow jackets were able to dig a hole to make the nest in the first place, wouldn't they just dig new holes and ditch the capped one? We had nothing to lose, so it was worth a try.

I waited until after dark one night to put a mason jar cap over the hole. Since yellow jackets go in the ground for the night, I could get close without much fear of being stung. The next day,  yellow jackets emerged from the hole but couldn't get out. They flew around inside the jar, contained.

By the second day, though, they dug their hole wider than the jar and a few managed to get in and out through the gap. I needed a bigger jar. In the dark, once again, I swapped out my containers. A thick, glass flower vase fit the bill.

As I worked, I  noticed several new holes had popped up in the yard. Interestingly, it looked like the escapees were digging down versus the trapped yellow jackets digging out. I put some jars on top of those, too.
 
The next day, scores of yellow jackets tried to leave the confines of the glass at the main hole, but they could not. Dead bodies piled up as the day wore on. I left everything alone it for several days. A few wasps still emerged and buzzed in the vase, but there were no escapees. The other holes stayed firm with no change. We were victorious...temporarily.


After about a week of nothing, more yellow jackets emerged. We suspect that the adults died out the first week and the second wave was babies that survived the famine as egg. With the vase still in place, they were all gone again after a day or two.

It has now been two weeks with no sightings. At one point, we talked about going out after dark one night, covered head-to-toe in thick clothing, to dump boiling water down the hole to eliminate any remaining life, but we think we are in the clear now.

Remnants of the yellow jacket hole

Labels: ,

8.07.2013

No More Cleaner Clumps

In green cleaning, I use several different powders: borax, baking soda, washing soda, oxygen cleaner (sodium percarbonate), citric acid. Some of these clump up in the humidity of our basement and are unusable. So, what's a green cleaning family supposed to do? Don't throw these products away! Instead, pull out your food processor and prepare for magic.

Step 1:
Dump the clumps in to a food processor fitted with the normal blade.
Some of the powder will get very fine and billow out of the machine. You may want to cover it with a towel.

 
 Step 2:
Whir away
Let the dust settle
Open the lid.
Step 3:
Transfer the powder into an air-tight container.
Also, you could pop in a packet of silica gel if you have one leftover from something else.
Those terracotta brown sugar bears (and other shapes) work, too.


Labels:

8.06.2013

Nursing In A Woven Wrap

Happy World Breastfeeding Week!

I am grateful to have nursed V for 18 months, at which point my milk turned fully to colostrum (at 37 weeks of pregnancy with baby E) and he gently weaned. E is now one year old (today!) and still going strong. I credit babywearing with making on-cue nursing possible with both my boys through vacations, work, and everyday life.

10-month-old V is ready to touch a lizard and then get rehydrated in the hot Caribbean sun

As a Volunteer Babywearing Educator for Babywearing International (BWI), I am frequently asked about nursing in a carrier. Here's a bit about my story...

When V was born, we had trouble latching which meant feeding was slow and frequent. I felt like I was nursing every hour of every 1.5 hours. Intense! I searched You Tube for videos on how to nurse a newborn in a wrap, but everything I came across used a cradle carry, which just didn't work for my anatomy, V's latching issues, or my back issues.

When V was five weeks old, I decided it was time to get some help. I attempted to take him to the local BWI meeting, but I drove us to the wrong location. When I realized that I had missed by chance for help,  I got back in my car and totally lost it. I was the crazy lady crying and screaming in my car. Yeah, the nursing intensity and back pain was that bad (plus the post-partum traumatic stress disorder that I didn't yet know I had). Once I calmed down, I made it to the correct location where several understanding moms welcomed me though I was late. They cheered me on and showed me some tricks. What I learned that day was gold and it has stuck with me as my favorite nursing carry.

What is this magic? The front wrap cross carry (FWCC). It is a great carry for nursing because baby sits in a pocket that can be easily lowed to get to the proper height for nursing and then heightened  back to the proper, "head is high enough to kiss" position when finished. This so revolutionized my life that I made a video when V was six months old, and I was still a novice, so I could pass on the love to others who might be feeling just as desperate.

Getting baby in a FWCC:
 
Nursing while in a FWCC:

Recently, I did a new version with tying the carry and nursing the baby all together:


These days, I can nurse in a wrap hands-free and do just about anything, but the day I learned it, I used my hands to go home and eat my lunch while my baby had sipped at his is lunch. I actually cried tears of joy at that accomplishment. Hands for eating was a big, big deal!

Breastfeeding can be hard work and require incredible determination, but--for me--after the rough newborn days (ok, ten weeks of blisters and struggles with my first baby), it led to being able to feed baby anywhere and anytime. Plus, when baby E came along, we were able to get to nursing in a carrier from day 1. It is a joy to pass the magic on to other mamas, now.

Baby E naps after nursing on his birth day.
(Disclaimer: a wrap should not have this much slack while standing)

Are you looking for information on breastfeeding and babywearing and local to Northern Virginia? If so, join me at Great Beginnings in Chantilly on Saturday, August 10. I'll be part of the panel on Supporting the Breastfeeding Mom from 12:30-1:15. Learn more about the event here.

Labels: , ,