More Green For Less Green

Living more eco-friendly for less money

1.30.2010

Eco-Friendly Area Rug Cleaning – For Free!

If you live in Northern Virginia, today you can get your area rugs naturally "dry-cleaned" for free today thanks to the snow! Any time it dry-snows (meaning the snow is sugar-like in appearance and cannot form into a snowball) and the temperature is below 25° F you can take advantage of nature's special natural cleaning power and use the snow to clean area rugs. Honestly, in NoVa I don't think these conditions converge very often. I have been interested trying snow cleaning for several years and it just has never worked out for one reason or another. But, today is the day!

I learned about snow-cleaning from one of my favorite books, Organic Housekeeping: In Which the Non-Toxic Avenger Shows You How to Improve Your Health and That of Your Family, While You Save Time, Money, and, Perhaps, Your Sanity by Ellen Sandbeck. (What a great title!) Snow-cleaning has long been used for very fine wool and silk rugs, but it should work for any rug. I decided to try it out with my beloved Turkish rug, which hasn't been cleaned, as far as I know, (besides vacuuming) since we bought it in Turkey circa 1987. Yowza!

Here's what to do:

First, you need to cool off the rug so it doesn't melt the snow when you lay it down. Roll up the rug and put it in a cool (preferably unheated) area of your house for a few hours. Once sufficiently cooled, take it outside and lay it pretty side down (this is actually called pile-side) on the snow. I put mine on the snow-covered back porch. Beat the underside of the rug (which is facing up) with a broom. You can also stomp on it, but as a child I was fascinated by the Turkish ladies beating rugs hanging from their balconies, so beating was the obvious choice for me even though this rug was on the ground. Beat, beat, beat or stomp, stomp, stop. Then pick up the rug, put it in the fresh snow of a different spot and repeat. For me, the initial beating spot wasn't black or anything so dramatic, but there were lots of hairs and a sufficient amount dirt, etc. Repeat beating/stomping and moving the rug until the snow underneath remains clean enough to your liking.

Then the tricky part—cleaning the snow off the rug before bringing it in. Ellen makes it sound so easy, "6. Sweep the snow off the rug 7. Roll the carpet up and bring it inside" (252). It was not quite so succinct for me.

I flipped the rug over (pile/pretty-side now up) and swept the snow off the rug. That part was fun and easy, but the snow kept falling on it. If you have a covered area (with clean ground), I recommend moving there. I swept off the snow in one part as best as I could, then rolled up the rug a smidge, then swept the newly exposed part of the back-side, then swept a little more of the pile-side, then rolled a little more, etc. until the whole rug was rolled up. I am not particularly coordinated so this part was rather awkward for me. Having a second person to help with this step might make it as easy as Ellen suggests it is. Alas, hubby is out today—so I de-snowed the rug alone. I got off as much snow as I could and then brought the rug inside for one final sweep-off in the basement. Unfortunately, even in our mostly-unheated basement it was warm enough to melt the small amount of remaining snow. So, my rug ended up ever-so-slightly damp. Since the aim is to keep the rug as dry as possible, really, really try to get off as much snow as possible outside.

Right now I have the rug hanging over the shower curtain rod in the bathroom to let it air out (it isn't dripping or anything). It looks great—the colors really pop again— and I can't wait to put it back in place later today.

Labels:

1.23.2010

Refinishing the Fireplace

Here's how we took our fireplace from this:

to this:


As I mentioned in a previous entry, I painted the brick facade with trim paint. I used a 6" fuzzy roller (thin, white, with an orange stripe) and a paintbrush and it took four coats. It still could use some touching up. Before we painted, we thoroughly scrubbed the brick with hot water and one of my castille soap-based cleaners. The keys to painting brick are patience and endurance. It is tough to get into all of those crevices and it just takes coat after coat.

Now, onto the doors (and keep in mind that I don't know the technical terms for things)...

Supplies: ratty fireplace door, soap, water, scrub brush, shop vac, towel, masking tape, newspaper, tarp, high heat spray paint, a paint vapor-blocking mask, 50-90F degree weather with less than 85% humidity and low or no wind, something sturdy to prop the doors open with, paint scraper, more newspaper, vinegar

May need: sandpaper or wire brush, lead paint-blocking mask, screw driver, needle-nose pliers

Look into the fireplace and see how the door frame attaches. For us, a simple metal bracket (attached to the top, rear of the door) hooks under the top of the fireplace's opening. We just had to lift the door a little, then angle it so that the clip was free of the brick, then pull it out. Here is our clip (in bad shape).


Our fireplace doors were thoroughly scratched up. If yours are not, you will need to sand the doors with sandpaper or a wire brush. Be sure to wear a lead blocking mask! Read your mask's specifications very carefully--this will probably be a $25+ mask that looks like something a bio-hazard worker would wear and not one of those little white ones.

Now it is time to clean the doors. This is a very dirty job. Since 50-90 degree weather is a must for spray painting, I took the doors outside to enjoy the nice day while I scrubbed and made lots of icky, black water. Using a scrub brush, I scrubbed the front with hot water and castille soap, then used a shop vac to get the water, crud, soot, animal hair, etc. out of the crevices. Rinse and repeat. Absolute cleanliness is not possible. I didn't stress about cleaning the glass too well at this point.


The back is especially gross. We probably could have replaced the insulation. But,I just tried to lightly vacuum it.


I dried the glass with an old, funky towel which was a good choice because even after all of that washing, loads of black came off. Then, I covered the glass on the front side using masking tape and newspaper. It was tough to make sure that every tiny bit was really covered, but imperative.

Folding the paper to be smaller than the glass (layering it when needed) and letting the tape fill to the edges worked better than cutting the paper to just exact size of the glass. When I could actually tuck the tape under the frame, I did.


I decided to only tape off the front of the glass and not the back. This worked out fine for me, but certainly do tape the back if the thought of scraping off errant paint stresses you out.

Once all the glass is protected and the whole thing is dry, it is time to move on to the painting. I chose RustOleum Specialty High Heat Ultra spray paint in black. It was about $6 at Lowe's. Brown and aged copper are also available in the ultra level which has a semi-gloss finish; green, white, silver, black and almond are available in the regular level which has a more matte finish.

I can't pretend that spray-paint is eco-friendly. It isn't. But, I do think it has value in restoring things to keep them out of landfills. RustOleum also sells a brush-on high-heat paint, which has fewer ingredients but ones that are more decidedly dangerous.

Following the directions on the can (and wearing your vapor-blocking mask), it is time to spray, spray, spray. Once the paint has set (after a few minutes), readjust all moving parts and spray more: prop open the doors (harder than it looks, you'll need something sturdy to hold them open--I used an old food tin), move levers, etc. You can recoat within an hour or after 48 hours. The less than one hour thing worked for me. I waited about 15 minutes in between coats.

Walk around the doors and look at all of the details from every angle, touching up as needed. Don't spray from too close or you will get drips that are no fun to fix (wipe off paint, spray a wide area again, hope it blends in). It will not look perfect no matter how many times you spray. Don't expect it to. Once it is in the room, the little flaws won't matter.


After the paint has set, repeat. Our chainmail curtain (I wonder what it is actually called) was rusted, so I decided to paint that, too. Repeat again if needed, but leave a little paint in your can for touch-ups (I still had plenty of paint left at this point).


Once the paint is dry (more quickly than you'd think), remove the newspaper and tape from the glass. Now it is time to focus on the glass. I cleaned the windows to a shine with a blend of 50% water 50% white vinegar. I let the spray sit (I spray it on but you can also wipe it on) for a few minutes, then I used a paint scraper to get off any chunky yuck (errant paint, wax, mystery goo, etc.) After that, I repeated the vinegar wash and this time I dried the glass with newspaper (no colorful pages). Newspaper is abrasive enough to actually scrub off crud, smoke stains, etc., but gentle enough to not scratch up the new paint job. Repeat as needed. Flip the doors over and repeat on the back of the glass.


Now that everything looks nice on the macro level, take a look at the little details. You may see some small places that need touch-ups--you may need to retape a small bit of the glass to do this. If needed, use needle-nose pliers to fix any loose chainmail links. Use a screw driver to tighten any loose screws. Once everything is sufficiently snazzied up and dry, reverse the removal steps and reinstall the door. Lovely!


P.S Guess what arrived? The new rug!

Here is a new view of the living room with the rug, fireplace doors, and some things moved around:

Labels: ,

1.18.2010

The New House—Part 3—Living Room & Fireplace

Today I’m going to do more gratuitous showing off of our progress ( I hope you are still enjoying the pictures), but I promise I have something "more green for less green" coming up: a step-by-step on how to refinish fireplace doors--cheap and keeps trash out of the landfill before it really needs to be there.

On to the living room pictures...


Living Room Before: the fireplace is painted maroon (that is not bare brick); filth abounds; the hardwood floors look rough; the scuffed, bronze fireplace doors have got to change. I do like the retro chandelier. We will move this to another room when we install a ceiling fan at some point.


In progress: The walls have been cleaned and primed and there are four coats of trim paint on the fireplace. (Chandelier lighting is causing the grey streaks on the walls.) The living room was tool central during the three working weeks before we moved in. Oh, and that card table was liberated from large trash day in my parents' neighborhood.


Did you notice the white fireplace in the picture above? Here is a close up. It took four coats of trim paint (Olympic zero VOC semi-gloss in ultra white) to fill in all of the nooks and crannies. High heat paint is not required for the facade, but it is required for the doors (which have been removed for cleaning and painting).


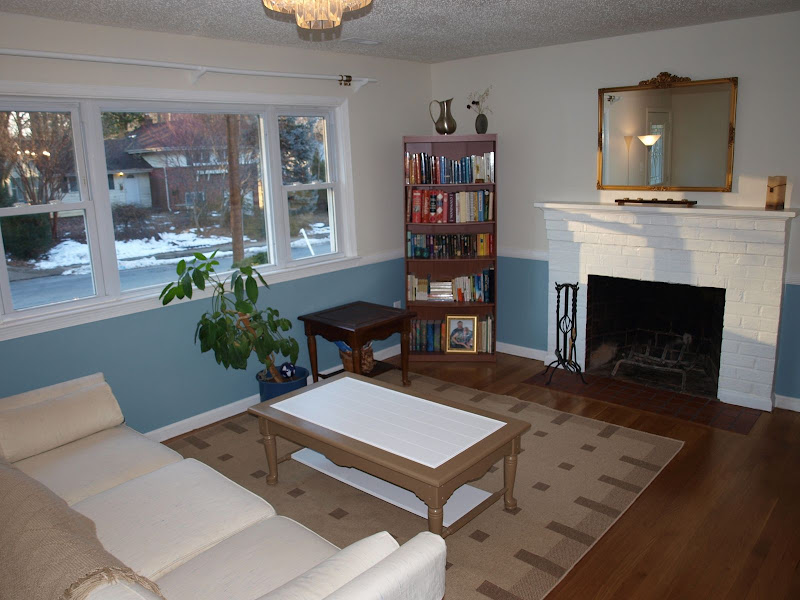
The living room has been cleaned, primed, trimmed, fireplace painted, and floors refinished back to their natural color. Now that the floors are lighter, we realize there is a tile patch in front of the fireplace. Who knew? The built-in bookcase and baseboards still need to be painted.

Other view of living room. There was a linoleum "entryway" patch at the front door that we had the floor team remove (no before picture of that, sadly). Luckily, the hardwood floors continued underneath the linoleum and were perfectly preserved. Now on to paint the baseboards--they look so yellow and gross in all of the pictures. We thought they might get scuffed during the floor refinishing so we wanted to wait.


Living room to dining room after (the mirror in the lower shelf of the built-in has since removed)

Now let's time warp!

Living room to dining room before

And time warp again...


Unpacking. We tried out the wine cabinet in the living room, but obviously that didn't last long (see pictures of it in the dining room in previous entry).


We painted the bottom half of the living room Mountain Stream(Olympic zero VOC, eggshell). It was much harder to pick a neutral for the top. We started with about 50 paint chips taped to the wall and these were the final contenders after a week of looking at them in various lights through the day and night. I had to hide the names so I wouldn't pick based on that.


We finally settled on Colonial White(Olympic zero VOC, eggshell)--most boring name ever. I would've never considered it based on name, so I guess it is good I hid the names. I do like the contrast between the trim and the wall now, but honestly, I still think things look really vanilla and boring. But, once we get some pictures on the wall maybe it will seem more fun. I am happy to have a place for my Turkish rug, though. When I was a child, my dad was station in Turkey for two years and we picked this rug out together. I'm not wild about the fringe, but I do love the pattern.


The main part of the room. Round table and mirror are beloved heirlooms from hubby's departed Grandma Sophie. The mirror has two accent pieces that we still need to hang. The pictured rug (purchased off Craigslist in 2004 for a mere $50 which is a steal for a wool rug) will move to our bedroom, office, or basement and we will put in this fun rug that I just bought off eBay:


My first choice for rugs is buying used wool rugs, but I was willing to new-splurge for the perfect wool, cotton, or recycled rug for the living room. I found this one on Pottery Barn's website listed as clearance/discontinued but I couldn't quite stomach the price (the price for wool rugs is much higher than the plastic/synthetic rugs that abound in the more less shocking price range). By the time I was willing to buy it, the rug went totally out of stock--no one at Pottery Barn had any leads. I started to stalk Craigslist for it and I set up an auto-search on eBay. After several weeks of looking, I got an email from eBay that someone was selling an 8x10 of the rug. I snatched that bad boy up and am waiting for it to arrive. I hope the blues in it compliment the wall color. I was supposed to do rugs then paint, but I just couldn't handle the white anymore.

Anyway, back on topic...


Another view (coffee table rescued from the side of the condo dumpster) In this picture the fireplace doors are not on yet.

But, they are on here...


Yay for refinished fireplace doors! This was my MLK day project.
(Some fun notes: I liberated the vase from a dumpster on Friday-- a large item, non-food, not at all gross one at work. The fireplace tools were kindly handed down from my dear friend Jill's parents). My living room is back to its normal state of vague disarray, so I do not have a wider picture of it in situ.

In my next entry, I'll give the blow-by-blow of refinishing the doors.

--------------

Update: Here is the room with the new rug in it. I'll post again when we get some curtains and wall hangings up.

Labels: ,

1.06.2010

The New House--Part 2-- Dining Room

Today I'll show you our progress in the dining room.


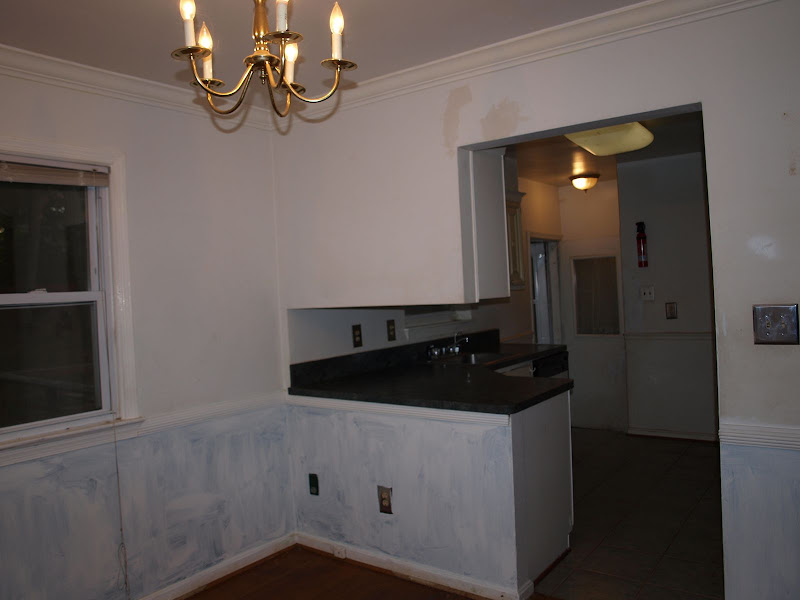
Dining Room (and pass-through to kitchen) Before: Above the kitchen entryway we found a huge, deep crack in the wall under the paint. We filled it with joint compound (thanks Dad F), sanded it down, and then painted it. It is obvious that the dining room had water damage at some point. Beneath the chair rail, the dining room was painted a high-gloss forest green with white half-heartedly painted over it. We tried to prime this as-is, but the primer just scratched right off. So, we had to sand it all first (thanks Katie, Christina, and Bart) and then prime.


Primed! In a few spots, mysterious pink and blue ink (?) would bleed through and no amount of primer/sealer would stop it. I finally decided to gougue out the spots with a chisel, fill them with spackle, sand, then prime. That did the trick!


After: Painted with color left over from the condo (thanks Suzi). The only drawback is that this is flat paint, which I don't think will hold up long with traffic in the room. We'll see what happens. Check out the professionally refinished floors! I'll talk more about the floors in later entries where the transformation is more visible. The baseboards still need to be painted.


Coming together


Furnished, but not finished. I bought the wool rug off of Craigslist for a mere $10 when I was in college and lived in an apartment with hardwood floors and an 80% rug rule. When I got married, I insisted that we keep my three wool rugs because cheap, attractive, wool rugs are hard to come by! We stored them in huge FedEx bags (the kind for skis or for shipping full-grown men according to a former coworker who got in one) for three years. I bought the curtains for $2 brand new at a yard sale, purchased in summer 08 and set aside. It was fun to finally be able to pull them out!


Still to do: replace the chandelier or spray paint and bedazzle the existing one (my hubby is so against that idea, but I have this vision...), put real paint over the primer above the chair rail, add tie backs for the curtains (though the knotted one kind of works) , finish putting stuff away, figure out what to do about the water stains now visible on the floor since we took them from a dark red to the natural wood color.

2-7-10 Update:
I finished painting Colonial White above the chair rail; re-caulked all of the trim (which took way longer than I thought); and I repainted below the chair rail with the exact same color, but in semi-gloss. The flat paint was already looking beaten up and since we had to take out all of the furniture to access the crown molding and chair rail, it seemed like the best time to do it.

A note on the semi-gloss—this is 3-year-old paint that we had left over from our old place. The lip of the paint and the lid had rusted, and it was nasty. To salvage the paint (because I am that cheap, and I do hate waste that much), I used a stir stick to lift out as many big rust chunks as I could. The paint was separated so it was easy to see the chunks suspended in the clear, oily-looking top layer.

Once big-chunk-free, I poured the remainder of the paint into an old, dried out, empty plastic paint can, being sure to pour the paint out against the least rusted part of the can lip. Luckily, I had one clear spot on the lip for this. If you don’t, you could try delicately covering that part with paint and letting it dry, then pouring over dry paint rather than rust.

Once in the new can, the paint still had some very small flecks of rust but there was no way to get them out. So, I just stirred them in. When painting, I never came across black chunks or anything.


And some gratuitous showing off of our beloved dining room furniture and glass collection…


Green glass, some new (wedding gifts), some vintage
Furniture is Broyhill's Continents collection. This is one of those things in our life that is in no way eco-friendly, but we looked at many possibilities over months and this was the best option (and after spending months picking it out, we had a 10-month wait when the furniture got stuck on a ship). We planned to keep it for a lifetime, so we are very happy it fits so well into the new dining room!


Pink glass glasses, cake dome, and 3-tiered server (wedding gifts) and the origami version of my bridal bouquet that my hubby made as a first anniversary gift (paper is the traditional gift).

Labels: ,

1.05.2010

The New House--Part 1


I’ve been absent for a while on the blog, but with good cause. We bought a house in November and have been working hard, hard, hard to make it livable! We started our housing search in January of 2009 with some strict, but not totally unreasonable guidelines: single family home, 3+ bedrooms, 2+ baths, a yard with potential for vegetable gardening; a fireplace and dining room would be nice. We knew we wanted a small house—lower utility usage (and bills), less space to fill, cheaper to make eco-friendly upgrades because things just aren’t as big, etc. We also knew we wanted to live in a very specific area near our offices. Because of the size we wanted, that left us with only about four neighborhoods, albeit rather large neighborhoods of homes that were built from the late 40s to the early 60s. Oh, and it had to fit our tight budget. So, maybe not such an easy thing to find…


Over nine months we looked at over 50 houses and put offers on 11 of those houses which breaks out as 5 foreclosures, 3 short sales that we were outbid on, and 3 short sales that we “won” and entered the long, frustrating process for. We ended up with house number 11—a foreclosure that had been vacant for just 1.5 months. Built in 1954, it was made very solidly with brick and old wood that lasts forever and just isn’t around anymore. It has three legal bedrooms on the main floor, one illegal one in the basement, two bathrooms, a fireplace, dining room, two kitchens, and a great yard. It also had some downsides—some big, some small: writing on the walls, a little mildew in the basement, a raging cockroach infestation (and thus droppings over every surface), a putrid smell, neglect.
We—and a team of generous friends and family plus some professionals—worked for three weeks before we moved in to get the house livable. We came to the work with four major mindsets:


  1. Focus on livability not aesthetics (at this point). We want to live in the house and see how it feels before deciding to make changes. For example, we want to learn the ins and outs of how our water pressure works before doing a grey water system. We want to watch the sun over the seasons before deciding if we want to save up for solar panels. This also allows us more time to find used things that we really love, like a neat lighting fixture for the bathroom.

  2. Preserve as much as possible We don’t believe in updating just for the sake updating. So, the turquoise tub stays, the floorboards with staining don’t get replaced, we spray-paint the brass fireplace façade instead of replacing it.

  3. Make wise purchasing choices We try to buy used things first and borrow things that are borrowable (like tools), and then buy low-impact products when we must buy new. When we do buy conventional, we do it with a well-thought out reason and occasionally we allow ourselves a fun, conventional splurge (the new shower curtain that I adore) but that is the exception, not the rule.

  4. Green clean We hired a green cleaning company to get off the first layer of filth and clean out the dead bugs and then did all remaining cleaning with homemade green cleaners. We did all mildew remediation with vinegar and borax.


We’ve had some great ups (the dishwasher we thought was broken actually wasn’t, friends and family who were AMAZINGLY generous with their time) some downs (small hole in the roof, the heat breaking two days after we moved in) and we’ve got lots of work ahead of us, but it feels good. Here’s a bit of our journey told through pictures with commentary…


Before: Our adorable home. It has tons of potential, but tons of work to do! To start, we've got mushrooms popping up in the front yard from a tree stump decomposing. The paint on the fascia boards is in bad shape. The gutters are cracked and worthless.

In progress: The previous owners removed a satellite dish but didn't plug the holes. This rotted out the soffit, fascia board and a joist. All of the fascia boards needed to be scraped and painted, but most were in great condition (yay 1950s construction old growth wood that is still trucking on).

After: New gutters, painted fascia boards, some roof repairs, stump removal, and a fresh blanket of snow!


The first time we saw the house the electricity wasn’t on and we though the house had a mold problem because of the black everywhere. On our second visit (the inspection) we had electricity and realized it was cockroaches—dead and alive— and their droppings. Yuck!

Check out the corner of the front door. Yes, they are cockroaches and yes, they are alive. Many of their dead friends were also around. We asked for an exterminator in our addendum.


That is dead, smashed bugs. Every place where two surfaces touched was covered in either cockroach bodies or their droppings. The house had only been unoccupied for 1.5 months at that point, so people obviously had been living in this.

We had professional cleaners (an eco-friendly cleaning company) for 5 hours plus many, many additional hours from family & friends & us.


We used all eco-friendly homemade cleaners from the book Green Clean. We spent three weeks living in our old place while we fixed up the new place. Until we had a sufficiently cleaned surfaces to set stuff down at the new place, each night I would take the empty
bottles back to the condo to reload for another day of hardcore cleaning.

The green bottles are for the kitchen and contain a degreasing formula (Castile Cleaner: 1t washing soda, 2t borax, 1/2t castile soap*,
2c hot water, 10 drops of essential oils, Green Clean p.136).

The pink bottles are a mildew-buster formula with vinegar for bathrooms and the basement (Scented Vinegar Spray: 1t borax, 1 T castile soap*, 1/8c vinegar, 2c hot water, 5-10 drops of essential oils, Green Clean p.136).

*Shredded castille bar soap, not liquid. See this entry on how to shred bars easily. I suppose you could use liquid, but it forms creepy, greasy globs when mixed with vinegar so, I stick to the bars.

I’ve lived by these Green Clean recipes for almost two years now, and they pulled through for us on this mega job! If we could green clean THIS, anything can be green cleaned!

I am tempted to finish this blog entry here, but I'm afraid you will think we are totally crazy and disgusting for living in this house if I don't show you some real "after" pictures. Because I am obsessed with my new shower curtain, let me show you the bathroom. (Bonus: if you know me in real life and have already seen the picture album, at the end is a new picture you haven't seen!)


Bathroom Before:Rotting window sill, cracked floor tiles (not visible), general ickiness, then we discovered bad plumbing in the sink and that the vanity was rotting.

Ickiness Close Up
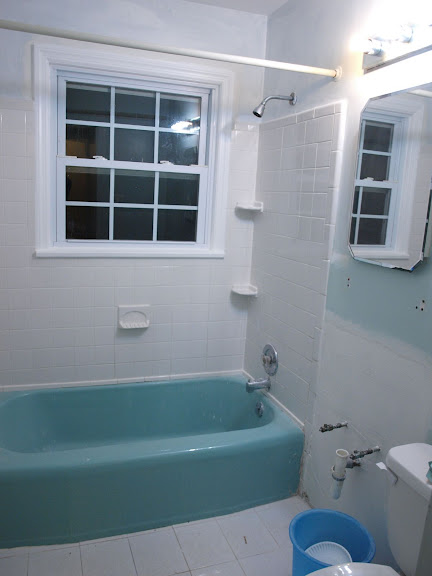

Bathroom progress: Damaged vanity and sink faucet removed, cleaned (several times), and a lovely new hand-crafted window sill (inside and outside)installed. The sill now has an angle to it so water won't collect plus it now has exterior paint on it. My dad headed up the window sill project. It seemed like tedious, precise work but he did an amazing job. Go dad! (And thanks to my mother-in-law for cleaning and my father-in-law for patching and painting the stained, crumbling ceiling.)


Vinyl lining added to lower part of window for privacy. Ick, plastic! But, this was a place where it seemed the best option. We bought the vanity new and while it looks great, it bugs me that we bought something new out of pressboard. Oh well. You can't win them all. On to happier thoughts: I adore this shower curtain! I wanted something to tie in the green and tan towels we already have but also work with the turquoise tub. You can see it better in the next pictures. (Update: It is from Target.)


Bathroom after: Painted Gold Buff (Olympic zero VOC paint), vintage lighting fixture and lightly used towel rack both purchased from the Habitat for Humanity ReStore installed, used eterge purchased from family member installed (not visible in the picture). The faucet is new, but we splurged for solid brass in hopes that it will last a lifetime.

Still to do: fix the things the picture doesn't show--the cracked floor tiles need to be removed, proper flooring support added, and new flooring put in. The ceiling will need to be replaced. It was in bad shape from a past ceiling leak and our patch job is already falling apart because of the moisture.

See...the grossness can turn into something adorable! I look forward to sharing more with you.

Labels: ,