Brewing Kombucha: Step-by-Step
(If you are wondering what kombucha is, start here.)
Day 1: Brew
Today, you will need
- 1 gallon water
- 3-4 bags or 2-4 tablespoons loose leaf tea
- 1 cup sugar
- 1 symbiotic colony of bacteria and yeast (SCOBY) and fermented liquid
- Pot
- Spoon
- Large glass brewing jar (mine is an old pickle jar)
- Sieve (if using loose leaf tea)
- Piece of cloth large enough to cover the jar opening
- Rubber band or twine(Additional details about these items are here.)

- Boil water in the pot.
- Remove from heat and stir in tea leaves and sugar.

- Let the sweet tea cool to room temperature. (I go about my day and then come back to it when I have time.)
- Pour the room-temperature sweet tea into the glass container/fermenting jar
- Strain while pouring if using loose-leaf tea.
- If your SCOBY came in fermented liquid, be sure to add this to the jar. Alternatively, you could add a bit of store-bought kombucha. If you do not have any already-fermented liquid, plan for your first batch to take a minimum of ten days rather than seven. If you are maintaining a SCOBY hotel, refresh your backup jar with any remaining tea.
- Cover the jar with cloth and secure with rubber band or twine.

- Leave in an out-of-the-way, warm place out of direct sunlight (indirect light is fine).


- Clean the Day 7+ bottling and brewing equipment (see preparation instructions).
Today, you will need
- 3-5 glass bottles
- Something to label storage bottles with
- Funnel
- Sieve
- Flavoring agents
- All Day 1 supplies, if starting another batch
(Additional details about these items are here.)
- One to two-ish weeks after you've brewed, it is time to bottle. The longer you wait, the less sugar will remain and the benefits of fermentation will be stronger. However, the taste will be more vinegary. Each family will have their opinion on when the brew is ready. We like 7-10 days. We did three weeks once, and it was not palatable.
- Inspect your SCOBY and the brew. Mold is bad. Colors in the realm of cream and brown are normal variations for a SCOBY. Bubbles also are normal, but not required.


The bottom picture shows the various colors and textures that a healthy SCOBY can have. You do no need to remove the SCOBY from the jar (though you can, if you'd like to rinse off the stringy and chunky bits) - If you are doing the continuous brew method, boil water and add tea and sugar. Let sit in the pot to cool. (See Day 1 for a review, if needed)
- In the meanwhile, bottle last week’s batch. The dishwasher door is a great place to do this and contain any spills.


E is not amused at being left out. - Pour the kombucha into glass bottles using a funnel and sieve (to strain out debris).

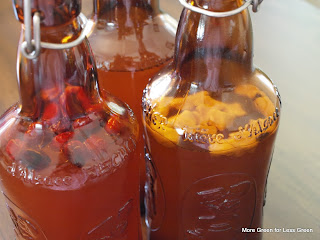
- If you would like carbonation, leave a good amount of head room.

The red is the kombucha. You can see I've left several inches of headroom on this narrow-necked bottle. I'd leave less with a wide-necked jar. - Leave some of the brew in the fermenting jar for the next batch (or to feed your SCOBY if you are not brewing again right away).

The SCOBY remains covered with old kombucha in preparation for a new batch.
- You can drink your kombucha now, or you can flavor it and then do secondary fermentation. Flavor the drink by adding pieces of fruit, herbs, or juice into the bottles. A post just on this is forthcoming, but I'll share that my favorite is freshly squeezed orange juice plus the rind.

Yummy organic oranges.
Cranberry, mango, and plain - Label the bottles with the date and flavors.

A grease pencil works well for labeling. - Let the filled bottles sit at room temperature for a few days to carbonate and undergo secondary fermentation (if desired).

The top of the refrigerator is a good storage space in our small kitchen. - If you are doing the continuous brew method, start your next batch by adding the cooled sweet tea from step 2 into the fermenting jar (along with the reserved fermented kombucha).


- Put the bottles in the fridge to end fermentation (so it doesn't become alcoholic).
- Drink as desired. (Take it slow if you are new to kombucha. The benefits to your gut health can be a little too good if you start with too much, too soon.)

Berry Kombucha

Labels: Food, Grocery Savings, Kombucha, Thrifty
posted by -Pamm @ 7:30 AM
![]()
![]()


0 Comments:
Post a Comment
Subscribe to Post Comments [Atom]
<< Home