More Green For Less Green

Living more eco-friendly for less money

8.12.2013

Me Versus the Yellowjackets

Our front garden is a haven for pollinators this summer, and we are thrilled! In early July, though, we noticed an influx of yellow jackets. I wasn't too fazed until one day I noticed dozens of them clustered near the path to our front door.


Upon closer inspection, I realized that they were zipping in and out of a hole in the ground. As I searched for information, I learned that yellow jackets have underground hives (sometimes huge ones), they can sting victims repeatedly, and they get more aggressive as the summer wanes. In other words--we were in trouble. How could we get rid of these creatures without spending loads of money and keeping green?

On the internet, the most popular suggestion was to pour gasoline into the hole. No way! Keeping our lawn a chemical-free play zone was key. This method is illegal, dangerous, and can have long-term consequences for the ground and its inhabitants. Rigging hornet spray on to a pole and putting that into the hole was another common suggestion. That seemed  complicated, dangerous, and we were worried about what that would do to our lovely organic veggies.

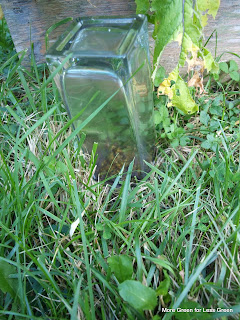
Ultimately, we decided that capping the hole with a glass vessel would be the easiest, safest, and cheapest tactic. The theory is that no wasps get in our out so the colony starves plus the glass creates a killer hotbox. But, would it work?  Since the yellow jackets were able to dig a hole to make the nest in the first place, wouldn't they just dig new holes and ditch the capped one? We had nothing to lose, so it was worth a try.

I waited until after dark one night to put a mason jar cap over the hole. Since yellow jackets go in the ground for the night, I could get close without much fear of being stung. The next day,  yellow jackets emerged from the hole but couldn't get out. They flew around inside the jar, contained.

By the second day, though, they dug their hole wider than the jar and a few managed to get in and out through the gap. I needed a bigger jar. In the dark, once again, I swapped out my containers. A thick, glass flower vase fit the bill.

As I worked, I  noticed several new holes had popped up in the yard. Interestingly, it looked like the escapees were digging down versus the trapped yellow jackets digging out. I put some jars on top of those, too.
 
The next day, scores of yellow jackets tried to leave the confines of the glass at the main hole, but they could not. Dead bodies piled up as the day wore on. I left everything alone it for several days. A few wasps still emerged and buzzed in the vase, but there were no escapees. The other holes stayed firm with no change. We were victorious...temporarily.


After about a week of nothing, more yellow jackets emerged. We suspect that the adults died out the first week and the second wave was babies that survived the famine as egg. With the vase still in place, they were all gone again after a day or two.

It has now been two weeks with no sightings. At one point, we talked about going out after dark one night, covered head-to-toe in thick clothing, to dump boiling water down the hole to eliminate any remaining life, but we think we are in the clear now.

Remnants of the yellow jacket hole

Labels: ,

7.31.2013

The Wonder of the Ground Cherry

 
The first year we started our square foot garden, I poured through every page of the Southern Exposure Seed Exchange catalogue, which specializes in heirloom and organic varieties that thrive in the Mid Atlantic region. As I read, I discovered something called a ground cherry that I never heard of before. The variety called Cossack Pineapple sounded especially delicious. How tantalizing is this?

1/2" diameter berries have a delicious flavor reminiscent of pineapple. Bite-sized berries are so tasty that they may never make it into the kitchen, especially if you have children. Excellent for preserves, hot dessert toppings, salads or mock pineapple yogurt. Plants are short (12"-18") but with bushy spreading lateral branches which choke out weeds. Fruits ripen to a pineapple yellow.
 
Everyone describes the flavor differently. My best description is a mix of chocolate and pineapple.
 
 
So, what are these tiny treasures? Ground cherries are native American variety of husk tomato and look like a tiny tomatillo while they are growing.
  

Tomatillo
 

Ground Cherry

Young tomatillos are on the top. Full-size cossacks are on the bottom. The tomatillo plant and fruit will grow to be much larger than the cossack as the season progresses. The tomatillo fruit remains green and often becomes sticky under the husk; the husk of the cossack will dry and turn brown and the fruit will fall to the  ground.


Ground cherries are a nightshade and should only be eaten when the husk has dried from green to brown and the fruit falls to the ground. However,  if you are feeling impatient, it is ok to give the plant a gentle shake to encourage the brown pods to fall to the ground.


Green and on the plant = not ready


Brown and on the ground = ready
 
Harvesting these little yummies is great fun for 2.5 year-old V who can gather them on his own and even pop few in his mouth straight from the garden since the husk keeps the fruit clean enough to eat right away. When they actually make it inside the house, it is fun to rinse and husk them.


Normally we just snack on these raw. But, I've also made them into jam and mixed them into chocolate frosting. The jam was yummy, though made a tiny yield. The frosting was a bust in that the chocolate overwhelmed the cossack flavor.
 
  
Because ground cherries are a native species, they grow very easily. The seeds we started indoors flopped, but the ones we direct sowed did wonderfully. Over the years, they have self-sowed and survived our various transgressions like forgetting to water or fertilize.


Our front garden is having a very good tomato, tomatillo, ground cherry year (along with some radishes to help with pests).  The ground cherry plants are in the front row, left side.
 So, what do you think? Will you give ground cherries a try?

Labels: ,

6.18.2013

Why Green Inside & Out? All of This Fun!

Cost and environmental impact are among the reasons why I switched to green greening our house inside and out, but as a parent I've discovered an added benefit: even the tiniest tot can get in on the action!

Inside, I feel comfortable with the kids being around our cleaners.. At 2.5, V is eager to spray and wipe everything he possibly can. While sometimes we just go with plain water, it is nice to really benefit from his eagerness. Baby E is still too oral to help that way (even green cleaners shouldn't be eaten), but I can tote him around on my back while I work without worrying about dangerous fumes.


Scrubbing the tub with green cleaners
The same holds true outside of the house. With a pesticide-free yard, our kids can go free-range: Baby E can explore on his own and eat a handful—or three—of clover or chickweed. Toddler V can play dump truck with grass clippings with his bare hands for an hour while I use the quiet reel-push mower right next to him.
 
Mowing Helper
Getting used to the feel of grass

Digging in the dirt pile in the backyard
With organic gardening, we get the fun of watering, digging, catching slugs, and eating veggies together. Everyone can lend a hand!
Square Foot Gardeners
 
Little Helper
 
Green cleaning looks different: things are clean, but not perfectly spotless. Green yards look different: we have more clover, plantain, dandelions, and chickweed than actual grass. But, the payoff is that we can enjoy them as a whole family more fully.
V & Dave 2012
E & Dave, 2013
Babywearing helps keep baby in on the outdoor action


Labels: , , , ,

6.19.2011

Rain Barrel Installation Part 2


The University of Rhode Island lists some great benefits to rain barrels:


  • Rain barrels conserve water and help lower costs (a rain barrel can save approximately 1,300 gallons of water during peak summer months).


  • Rain barrels reduce water pollution by reducing stormwater runoff, which can contain pollutants like sediment, oil, grease, bacteria and nutrients.


  • Rain barrels can also be arranged to slowly release the collected rainfall to areas that can soak up the water, reducing stormwater runoff and increasing groundwater recharge.

Here is more on our rain barrel installation:


(See Rain Barrel Installation Part 1 here if you missed it.)


Installed!


We used cinder blocks (thank you Freecycle) to raise the rain barrel so the spout is high enough to fit a large watering can underneath (this factored into our measurements before we cut the downspout). I've been stalking Freecycle for trellising to put around the cinderblocks to hide them and make things look nicer.


Lesson Learned

Vertical cinderblocks are tippy. When our barrel got full and heavy, it went for a tumble (and even more of the paint is scraped off). We rearrange the blocks horizontally to be more stable.


Overflow Preparation
The rain barrel fills up surprisingly quickly when we have a storm, so a full-size overflow spout keeps things moving. Also, we already have water issues, so we wanted to make sure the overflow was getting routed to the sewer as efficiently as possible.


Mosquito-Free Zone

Because any standing water can become a mosquito breeding ground, we pop these plant-and-wildlife-safe mosquito dunks into the barrel a few times per season. Technically, closed mosquito barrels, like ours, are not at risk for becoming breeding grounds, but I'm happy to be extra cautious and add the dunks.


Final Thoughts
Rain barrels are very low-pressure, so it is helpful to have two watering cans--one can fill up while the other is being poured on the garden. It would be great it there was some way to connect a rain barrel to sprinkler hose and get that to actually work, but I just don't think the barrel affords that kind of water pressure.


Yes, it takes some effort to fill up the watering can(s) to water the plants, but it just takes a few more minutes than dragging around a hose, and it is a good way to get in a little exercise, saves money, and can keep your lawn or garden growing strong during water rationing.


Remember, rain barrel water is not potable. Thoroughly wash produce grown with it before eating. Do not use rain barrel water for washing hands or swimming.


Want to make your own?


Here you go.

Or, if you live in the Northern Virginia area, check this out. At workshops in July and October 2011 you can build your own rain barrel for $52 or buy one for a mere $62.

Labels: , ,

6.15.2011

Rain Barrel Installation Part 1

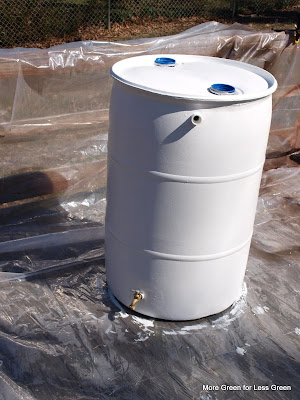
Our second year of Square Foot Gardening is off to a good start, as is our second year of watering the plants from a rain barrel. Commercial rain barrels are pricey, and I am not wild about buying new plastic items, so we started searching Craigslist for used rain barrels. When we found a listing for new rain barrels made from reclaimed 50-gallon food drums for a mere $35 each, we were sold! Well, we were sold enough to put them on our Christmas list as our number one wish (our families are big on wish lists).


We installed one rain barrel in the back of our house last year. Here’s how it went…

Painting It White
I used exterior primer and paint. It looked good for a couple of minutes before it got its first couple scratches. I should’ve put a clear coat on top. We might just go with the blue when we install the one in the front, especially now that we have a bright blue front door and are working on blue shutters.


Installation
After carefully measuring how high we want the rain barrel, hubby bravely hand-saws through our brand, spanking new downspout.


Time to connect the shortened downspout to the rain barrel.


In Part 2: lessons learned and more pictures.

Labels: , ,

4.15.2011

Milk Carton Garden Markers

Don’t toss that empty milk carton in the recycle bin just yet! Armed with scissors, a hobby blade, and a Sharpie, it takes just a few minutes to create garden markers sturdy enough to weather through a whole growing season and beyond. For this year, I just cut off the printing from last year's carton garden markers and still had plenty of marker left.


Cutting away the flat surfaces from the curved ones


Sloppy cutting doesn't phase me, as only the very top part ends up sticking out of the soil. The whiter ones are from the section where the carton label is.

In the raised beds (with room for writing notes, if desired)


Depending on the plastic recycling guidelines in your area, your creations should still be just recyclable when you are done with your creations.

Labels: , ,

5.02.2010

Building Raised Garden Beds

Here's what we did:

Step 1: Gather untreated wood in proper dimensions

For us, this was a combination of reclaimed wood off Freecycle and new wood from Home Depot. All three of our beds are 4x4 feet. Two are six inches deep and one is eight inches deep to accommodate carrots. I really riled up Mr. Random Customer behind me in the wood-cutting line at Home Depot by getting untreated wood, which will eventually rot away. We figure, better to replace it in a few years than to have chemicals from treated wood leeching into our organic veggie garden. He was shocked by the idea of letting the wood rot and re-found us four times in the store to give us new ideas of how to prevent the wood from rotting. We stuck to our original plan. I really struggled with buying conventional wood, but I could not find lumber that was the right dimensions and Forest Stewardship Council (FSC) (or the like) certified, save for one bed-building kit at Home Depot that came with—oh irony—treated wood.

Step 2: Mark Starter Holes

Ascertain the width of the boards. Half of that distance is where you will make your mark. Our boards were 1.5 inches thick so our marks needed to be ¾ inch from the end of the board. Spatial things are my kryptonite and this did not initially make sense to me, but hubby explained that this will line the screws up precisely in the middle of the adjoining board in the next step.

Step 3: Bore Starter Holes

Pick the drill bit that is the appropriate size for your screws (be sure to use galvanized/outdoor screws). We bored three starter holes in each board. All three should be in a row go all the way through the width of the board. You will only make holes on one side of the board.

Step 4: Outline the bed

Lay the boards in the shape of the bed.


Place sides with holes against sides without holes.

Step 5: Prepare Middle Pilot Hole 1

Make a pilot hole to prevent the wood from cracking when you put in the screw: with the drill bit, drill through the middle hole of one board squarely into the middle of the adjoining board.

Step 6: Insert Middle Screw 1

Now, put in your first screw.

Step 7: Address remaining middle holes

Create a pilot hole and insert the screw for each of the remaining three middle holes. Drill and screw at each corner before moving to the next one, as your wood will shift slightly each time and pre-drilled pilot holes may not line up.

Step 8: Address remaining holes

Create a pilot hole and insert the screw for each of the eight remaining holes (two at each corner). Now that the frame's shape is secure, you do not have to keep alternating between pilot holes and screws. Drill all remaining pilot holes at once; then do a round of just inserting screws.

Step 9: Place the bed in the yard and watch the sun

The bed is empty and light now. So, place the bed then watch the sun on it. On a day I was home all day, I set a timer and on each hour I made notes as to the sun conditions and then checked back in another hour. The empty beds are easy to move if one position doesn't work out.

Optional Step: Create a bottom
(visible in picture above)

We are concerned about moles and groundhogs digging up into our beds, so we decided to put a galvanized wire "hardware cloth" bottom on the two beds that will be in the backyard.


  • Decide which side you want to be the top of the bed and put that side face-down.
  • With the bottom of the bed facing up, line up one edge of the hardware cloth with one edge of the bed, centering it.

  • Fold the sharp ends of the wire under. Staple-gun the wire down, using just a few staples.

  • Unroll the wire to reach the opposite side of the bed.

  • If the wire is too long, you could cut it, but we chose to simply fold it over.Make sure the hardware cloth is lined up to amply cover the remaining two sides.
  • If the wire will not line up, remove the staples on the first side with needle-nose pliers and try again. If it does line up, staple-gun the wire down.
  • Then, heartily staple down all four sides.

Cost

Lumber for three beds $26 (plus the free wood from Freecycle)
Galvanized screws= nominal cost, about $0.50
Hardware cloth for two beds:
$26
Subtotal: $52.50

Still to be determined: supplies to keep the squirrels and birds away…

Labels:

3.18.2010

Indoor Seed Starting

I started growing some of my seedlings indoors using the paper towel method that I read about at The Dirty Radish here and here. She refers to it as seed sushi, which I just love to say. Rebel that I am, I decided to start my rolls in lidded Pyrex (which I am obsessed with and own tons of) rather than plastic bags (which I detest, because we have a policy of washing and reusing them and it is a hassle). After a day-and-a-half, I realized that this was a mistake. The rolls dried out way too quickly with the greater air circulation between the rolls and the lid. I am a totally newbie at gardening, and though I have done obsessive amounts of reading, I really don't have much practical experience yet. So, enter the first of many mistakes I am sure to make!

Now ready to actually follow the guidance of others, I sanitized a plastic bag (yes, I actually used my nemesis, bleach) and put the rolls in there, as I should have done from the start. That did the trick! I still need to spritz the rolls about twice a day, but now they never totally dry out.

I am tickled with this method. At one week in, the eggplants and jalapenos were almost free from their seeds and the bell peppers had little root tails. At a week-and-half-in, I was able to plant some of my seedlings. The only bust so far is the rosemary, which is notoriously hard to grow from seed, so I don't feel too bad. Out of 12 seeds, only one shows the slightest sign of growth.

Thrifty girl that I am, I couldn't bring myself to buy labeling sticks when I ran out of the craft sticks I had on hand, so I cut up the lid of a large yogurt container and wrote on the pieces with a Sharpie.

Below is a picture of my set up in the basement with a mix of seedlings in potting soil and seeds still emerging with the paper towel method. The light chain isn't very long, so I've got a combination of the seed tray, egg cartons, and wood stacked under the heat mat to get the seeds close enough to the light. I keep my spray bottle of water upstairs so it stays warmer and doesn't shock my little guys by being too cold. The light is on a timer, I've got it on for 14 hours a day right now. The heat mat (not visible, it is under the green tray) stays on all the time.

Coming up in the world of indoor seed starting: I'll do bergamot (the herb, not the orange) and oregano; then tomatoes, ground cherries, and thyme; then marigolds; and possibly lettuce somewhere in there. After that, it will be time to sow the outdoor seeds.

Labels: